Monday, March 13, 2017

Celebrate Spring with Etchall(R)!


Etchall(R); a little paint and some embellishments will take an inexpensive glass container to new heights!  I will show you how I transformed an apothecary jar and a glass bottle into gifts I would give or keep as home decor.


Materials:


Etchall(R):  etching creme; dip 'n etch liquid; "Love you a Latte" stencil; Detail Pick Tool;  Squeegee
Glass:  apothecary jar; heart shaped bottle with cork lid

Paint:  Multi-surface acrylic - Teal

Sponge
Ribbon
bunch of silk flowers
mulberry or paper flowers
scissors
painters tape or masking tape
plastic container for dipping

Adhesives

Instructions:

** Before you start:  You will be re-using the etchall(R) creme and liquid.  Do not throw it away!  It is good for many uses even if it starts turning brown as it has in the photos shown here.  I will use it for as long as it keeps etching.

1.  Dipping in etchall:  Cut the top off of a disposable plastic container.  The smaller size; the better.  It has to be large enough for the piece to fit.  We are dipping the apothecary lid.

2.  Put the item you will be dipping in the plastic container.  Fill with water to cover the lid.  Use a marker to draw a line on the bottle at the top of the water line.  This will show you how much etchall you will need.

3.  Dump out the water and fill the bottle to the marker line.  Place the glass lid in the liquid and set the timer for 15 minutes.  15 minutes is the standard amount of time you will use when etching with etchall(R).

4.  When the time is up; remove the lid from the etchall liquid.  Rinse & dry thoroughly.  

5.  Pour the etchall(R) liquid back into it's original container.  It will be good to go for another project!  I used the dip 'n etch to etch the heart shaped bottle using the same instructions.

6.  Now it is time for the Etchall(R) Creme.  If this is the first time you have used an etchall(r) stencil, I recommend watching an instruction video with Barbee which you will find here:  http://etchall.com/getting-started/

7.  Follow the instructions given and apply the stencil to the jar.  Use the Pick Tool to remove the pieces of the stencil that will make the design on the glass.  Make sure to leave the stencil in the places that give definition to the design.

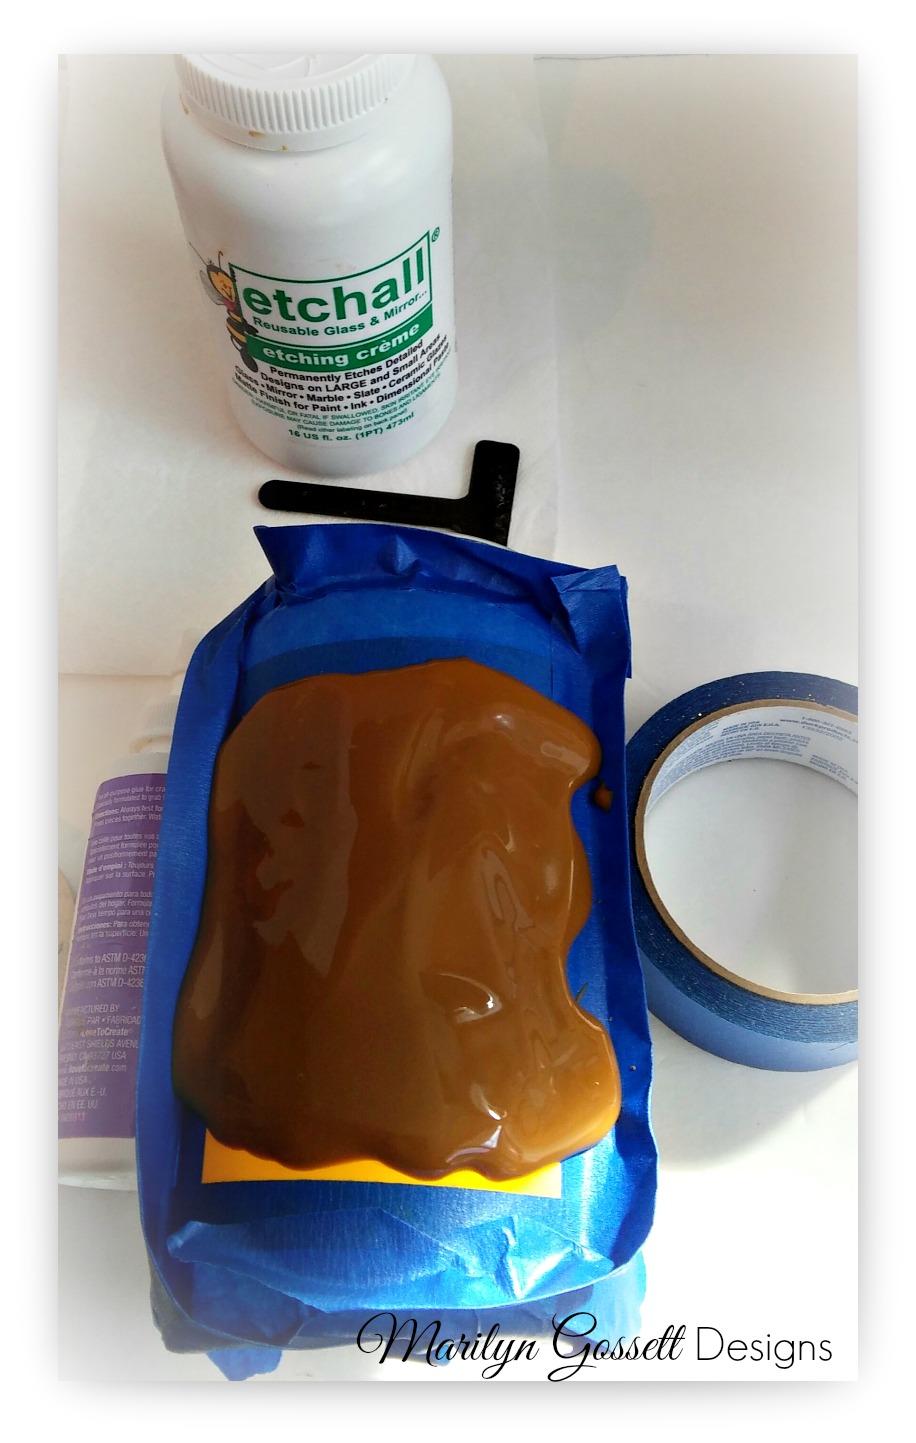
8.  Follow the instructions given to apply the stencil to the front of the jar.  After picking out the pieces that you won't need; use the Squeegee to remove any air bubbles and to seal all of the edges.  Further prepare by applying tape around the stencil so that the etchall creme won't slide down the sides of the jar.  

9.  Apply a thick layer of etchall creme to the top of the stencil and lightly spread to cover the stencil.  Set the timer for 15 minutes.

10.  The magic!  When the time is up, use the Squeegee to remove as much as you can of the creme and return it to the original container.  As with the liquid, the creme will turn brown over time and multiple uses; but it will still etch!  Once the creme is put back in the container; rinse the jar under warm water, removing the tape and the stencil.  Once it is clean; give it a good dry and see how pretty the design looks!


11.  Once the lid is dry; paint it with the sponge using a pouncing motion.  Apply another coat as needed.  Allow to dry thoroughly before inserting into the top of the jar.


12.  Embellish!  Tie the ribbon around the neck of the jar.  Finish by adhering a pretty flower to the ribbon.  Trim a V in the ends of the ribbon.


I hope you got some inspiration here today.  

Make sure to take time to enjoy the small blessings along the way and,

Live Life with a Flourish!

Marilyn


I receive complementary product in
exchange for my creativity on this blog.


Tuesday, March 7, 2017

Make your storage pretty!


The Deflecto interlocking set of tilt bins is one of my favorite storage products.  I have used them as a single storage bin or assembled as a unit.  I have decorated some of them with paint and craft supplies. I added some acrylic knobs for my latest project.  I love the way they look and knobs are easy to find these days!


If you decide to add some knobs to your storage you will need a few things to start:

1.  Drill with a drill bit to match the size of the screw on your acrylic knob
2.  Nut and washers to tighten the knob to the bin
3.  Screwdriver to tighten the screw
4.  A thick book or magazine (I used an old phone book) to drill on


Hope you got some inspiration here today.  Make sure you have your plan well mapped out before getting started.  You want to take good care of your storage bins!


Make sure to take time to enjoy the small blessings along the way and,

Live Life with a Flourish!

Marilyn


I receive complimentary product
in exchange for my creativity.


Monday, March 6, 2017

Spring Crafting! Much more fun than cleaning!


A wooden frame, a little paint, some bottle caps, AND some magnetic craft sheets!!  Yep!  I transformed this inexpensive wooden frame into a magnetic surface that has some serious playful possibilities!


Read on, and I will explain.  My first idea was to make this a magnetic frame with various magnets that could be moved around on the frame.  I gathered up some bottle caps that I had previously decorated and some wooden flower shapes.  I had an idea while doing this.... thinking that individual pictures of the family members could be punched out to fit inside the bottle caps....and a family group picture could be placed inside the frame. That was a different idea from what I was doing; but I still think it is a good one!

I chose to make my wooden flowers into magnets and glue the bottle caps to those; but imagine the possibilities with different shapes and themes.  So, here are the items that you will need:

Supplies:

deflecto:  magnetic craft sheets:  #5901
Wooden Frame:  unfinished 8" square from craft store
Wooden Flowers:  3-3/4" wide x 1/8" thick; 3
Wooden sentiment:  unfinished 1" high x 4" wide word "Create"
Bottle Caps
Dimensional medium:  Clear
Matte Chalk Paints:  lt. pink, beige, teal
Adhesive
Paintbrush:  1" flat
Pencil
Scissors
Water container
Paper Plate
Paper Towels


Instructions:

1.  Lay the frame face down on the white side of a magnetic craft sheet.  Using a pencil; trace around the outside and inside edges of the frame.  Cut out.  Set aside.

2.  Paint the frame and flowers.  Let dry thoroughly.  Adhere the white side of the magnetic frame cut-out to the top (front) side of the frame.  Repeat with each of the flowers.

3.  Paint the wooden word beige.  Adhere to the top corner of the magnetic frame.

4.  Punch out images of family members or other digital art.  Adhere the wrong side of one image into one bottle cap.  Smooth out any air bubbles.  Repeat for each one.  Let adhesive dry.

5.  Apply the dimensional medium over the top of each image in each bottle cap.  Allow to dry thoroughly.
Glue one to the center of each flower.

6.  Each magnet should clamp to the frame.  Sometimes you will have to adjust them a little before you get a tight fit.  These magnets can also be displayed on the refrigerator or other metal surface.

7. Cut out and place your main image in the frame.  Enjoy!


I hope you got some inspiration on the blog today.  If you have any questions or comments you can leave them at the bottom of the page.  I enjoy hearing from you.

Make sure to take the time to enjoy the small blessings along the way and,

Live Life with a Flourish!

Marilyn


I receive free product in exchange
for sharing my creativity on this blog.


Thursday, March 2, 2017

Celebrate St. Patrick's Day with help from Deflecto!


Deflecto has a surface and storage for every event and celebration.  St. Patrick's Day is up for March and green is in!  I love to have a few girlfriends over for a luncheon and a holiday is always a great reason to have a gathering!  Here are a couple ideas for making St. Patrick's Day special!


You will need:  

Deflecto:  X-Divider Cube #350201CR; Craft frame 4" x 6" green #69574CR
12" x 12" cardstock papers:  Green, black with tiny white dots, black and white harlequin 
Adhesives
paper trimmer
digital St. Patrick's Day signage, 3" x 4-1/4" (download from internet & size before printing)
scissors
embellishments


Instructions:

1.  Cut the green cardstock into four 6" squares. Cut the black into 5-1/2" squares; the damask paper into 5" squares.  Layer and adhere to the sides of the cube.  Leave the bottom of the cube clear.
2.  Apply any embellishments, rubber stamping, etc. to your liking.

3.  Fill the compartments with dinnerware and napkins.  Enjoy!

For the frame:

Cut the papers as shown in the photo given.  Layer, adhere and place inside the frame.

Rosettes:  Cut the green cardstock in strips (size depending on the width you would like your rosette to be).
Score and fold each strip.  Make a circle, glue the edges together and secure by gluing a punched circle to the middle of the rosette. Repeat on the opposite side.  I use hot glue for this step as it is easier.  *Designer note:  You can google instructions on "how to make a paper rosette" if you could use a little help!  


Adhere your embellishments to the frame.  I made the 3-D clover with punched hearts and circles.  Sponge a little ink around the edges for a little more depth to the embellishments.


Did you get some inspiration here today?  I hope so!  Take advantage of every opportunity to celebrate life and friends!  Thanks for taking time to stop by the blog today!

Take time to enjoy the small blessings along the way and,

Live Life with a Flourish!

Marilyn


I have rec'd complimentary product in exchange
for sharing my creativity on this blog.