Friday, July 12, 2019

Wedding Candy Bin with Joy

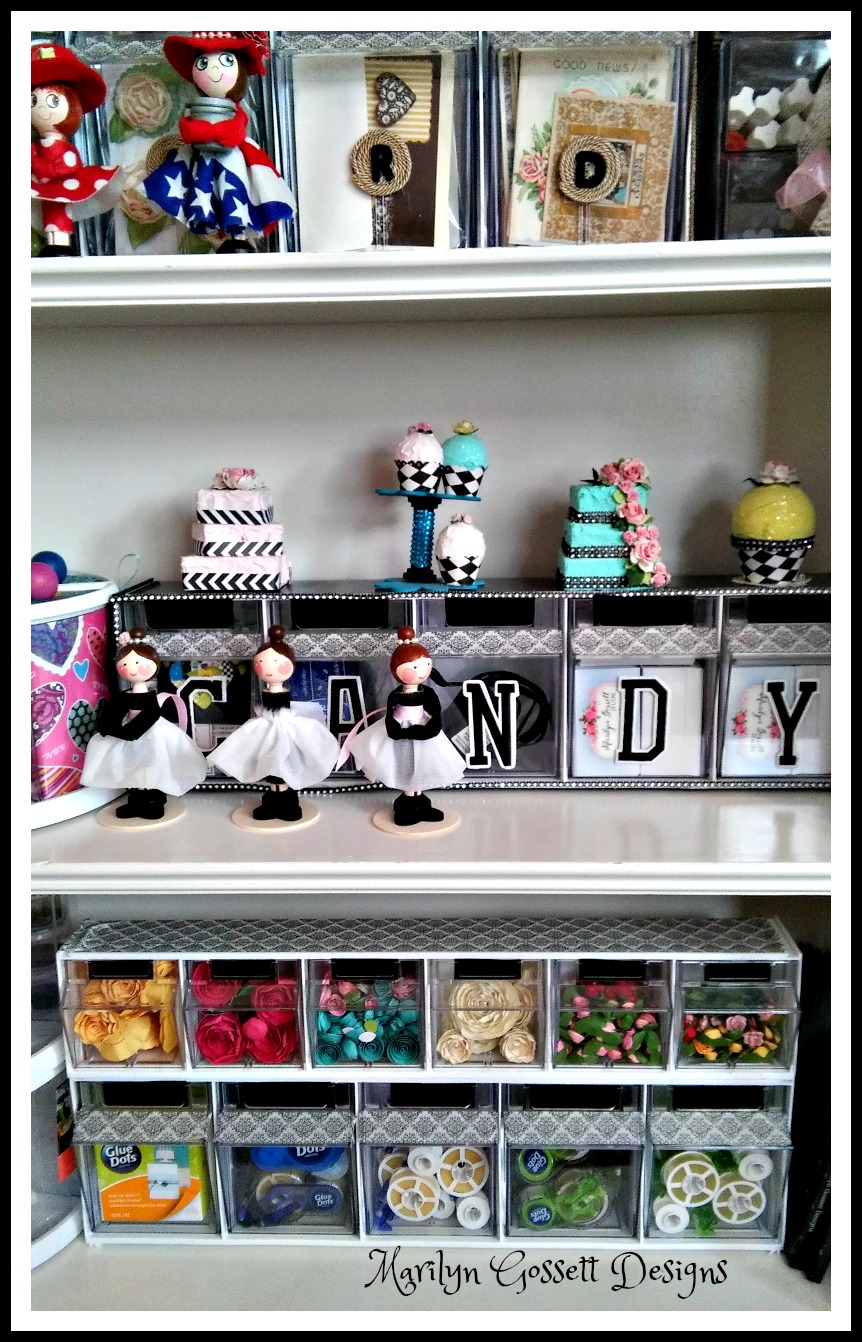
What is a wedding without sweets, right?  I have a great idea for using a craft storage bin and Joy® embroidered letters to serve up treats for the wedding guests.


I used the 3" Joy® black collegiate letters.  They have an adhesive on the back side that is meant to be temporary; as the permanent adhesive is heat activated.  In this case; I removed the release paper from each letter and applied one to each bin to spell "CANDY".  You should be able to remove them after the wedding and use the bins for craft storage.

You will need:

Joy®:  3" black embroidered letters to spell CANDY
Deflecto:  Craft Tilt Bin by ; a 5 bin unit
spray paint for use on acrylic plastic, black (or color of your choice)
trim:  single strand faux rhinestone self-adhesive
scissors
painters tape


Instructions:
  • Remove the bins from the unit.  Line them up on a flat surface.  Remove the release paper from one letter, center and apply to the bin.  Leave it loose until all of the letters are lined up evenly. Repeat for each letter.


Close-up View below
 
  • Tape off all areas you do not want to apply paint to.  You may choose to leave the bin unit white.  That is perfectly OK!
  • Cover up any small holes with painters tape on the inside edges of the unit.
  • I applied clear packing tape across the front to protect the inside of the unit.  Then, applied painters tape around the front edges.
  • In a well ventilated area; follow the manufacturer's instructions and paint the entire unit with the exception of the inside.  Allow to dry thoroughly.  Remove the tape.  Reinsert the bins.


  • Each bin will have a slot and paper to identify what is inside.  Embellish the edges with the faux rhinestone trim.
If you would like to know how I made the mini faux cakes on top of the candy bin; check out the blog post link here:  http://marilyngossettdesigns.blogspot.com/2016/04/mini-wedding-dessert-with-smoothfoam.html

  Hope you got some inspiration for your next celebration.  I am going to do "BABY" with a four bin unit next!

Joy® iron-on embroidered letters are available individually or in full alphabet sheets in a variety of sizes, colors and fonts at your favorite craft stores.


Thursday, May 16, 2019

Tea Time Any Time


It is always time for tea!  Spring is here and we will be enjoying our yards, flowers and decks.  This fun project is perfect for a gift or for a lovely piece of decor to bring out at tea time!


You will need:

Joy® Embroidered Letters:  1" white spelling TEA
Jar Mug with Lid:  clear with embossed label area
felt:  sheet of dark pink; 1
ribbon:  5/8" sheer light green
flowers:  handmade paper roses; red, yellow, antique white with green leaves
               1" to 2" blooms
pencil
scissors
tacky glue
glue gun and glue sticks
stash teas, various flavors


Close-up view of the jar


Instructions:

1.  Flatten the felt on the table top and trace around the lid using a pencil. Cut out along the pencil line.

2.  Screw the lid onto the jar.  Apply glue to the lid surface and smooth the felt onto the lid.  This will secure the inner seal to the outer ring of the lid.


2.  Screw the lid onto the jar.  Apply glue to the lid surface and smooth the felt onto the lid.  This will secure the inner seal to the outer ring of the lid.


3.  Arrange and adhere the flowers to the lid using the glue gun.

4.  Adhere the letters spelling TEA to the front of the jar.


5.  Remove the lid and fill the jar with tea bags.  Replace the lid. Tie a bow around the neck of the jar to finish.

ENJOY!


Friday, February 1, 2019

DIY Valentine's Apron for your February Occasions


Who doesn't want a little sugar around Valentine's Day?  Whether you are a chocoholic or just need a kiss and a squeeze, this easy DIY apron will bring some smiles to your friends and loved ones.


You will need:

Joy embroidered letters:  1" white; 2 packages
apron:  One size fits all; red
wooden cupcake:  pre-painted wooden cut-out
jewelry finding:  1-1/2" pinback
tacky glue

iron with steam
ironing board surface
pressing cloth


1.  Press out any wrinkles in the apron.  Lay out the letters in formation desired prior to applying heat.

2.  Apply heat to the letters, apply pressure to adhere.  I used a pressing cloth for this step.  Once the letters were set in place; I pressed it from the wrong side of the apron to insure adhesion.


3.  Cupcake:  Apply a 1-1/2"  line of glue to the middle of the wrong side of the cupcake.  Lay the pin back in place and allow to dry thoroughly.  Attach to the apron as shown.


Designer tip:  There are many pre-painted wooden cut-outs to choose from.  You can change out the image if you like!


Look for Joy iron-on, embroidered letters, letter sheets and floral appliqués at 
your favorite craft stores!

Saturday, May 5, 2018

Decorate a Tip Jar with StyleTech Craft Vinyl

Do you save up money to take a special trip, buy gifts, etc.?  My son-in-law likes to drive Uber and Lyft on the week-ends and I thought this would be a fun gift for his recent birthday!  The jar is decorated with the different suits of a deck of cards with a money sign on the lid.  I printed out 32 tips for a good life and attached them with washi tape to 32 $1.00 bills (the number of his years) for seed money in his jar.


Read on to see how I did it!


Materials:

  • Styletech Craft Vinyl:  Ultra Metallic:  Green 131, Black 128, Gold 127, Red 129
  • Styletech Craft Vinyl Tape:  Ultra Metallic:  Gold, 1/2"
  • Styletech release paper
  • Jar:  clear glass 4-1/2" wide x 5-1/2" tall square with lid
  • rubber scraper; pic tool
  • Die-cut machine, shapes:  diamond, clover, heart, club, circle, square, alphabet letters, dollar sign
  • Adhesive rhinestone and faux metallic pearls
  • scissors
  • measuring tool such as a ruler


Directions:

  1. Set up your die cut machine to cut vinyl.  Measure the flat surface of one side of the square jar and cut out one square to fit that size.  Apply the release paper to the top of the colored vinyl, covering the cuts. 
  2. Weed the vinyl and white release paper from the Styletech release paper. (If you are new to applying vinyl; there are many videos on youtube that show tutorials to educate you on weeding vinyl.)   Apply the vinyl (adhesive side) to the side panel of the jar, smoothing out all of the air bubbles.  Use a straight pin to lightly prick an air bubble if you can't get rid of it with the rubber scraper.  Repeat with the red heart and diamond and the black club and spade for the other sides of the jar.
  3. Measure the top of the lid.  Cut a circle to fit the lid.  Apply release paper, weed out the excess vinyl and the white release paper.  Apply the circle to the top of the lid as for the sides of the jar. (See view #1)
  4. Cut out the dollar sign from the green vinyl.  I cut the dollar sign shown here at 3".  If you are using a different size jar lid; measure to get the right size.
  5. Cut out alphabet letters at 3/4" from black vinyl to spell "Tips".  Apply letters and dollar sign as for steps #1 and #2.  Use the rubber scraper to release any air bubbles.
  6. Finish:  Embellish the jar using the faux adhesive pearls and rhinestones.  Apply the gold vinyl tape around the sides of the jar lid.  If you can't find the tape; use the paper trimmer to cut a strip of vinyl to apply instead.
  7. Refer to the photos shown below which portrays each side of the jar.


View #1


View #2


View #3


View #4


BONUS

Money & Tips!  I googled "tips for a good life" and found some good advice given in numbered tips.  I copied and pasted into a word document and made the font the size I needed....about size 14.  

Space between the numbered tips so that they can be cut out individually.  I used a paper trimmer to cut and a scissors to trim any excess paper.  I attached one tip to one dollar bill with a piece of Washi tape.  Repeat for each of the tips.  I used 32 tips and bills for the number of years the birthday recipient was celebrating!


Thanks for visiting the blog today.  

Take time to enjoy the small blessings along the way and,

Live Life with a Flourish!

Marilyn


Disclaimer:
I receive free product in exchange
for my creativityin this blog.


Sunday, April 1, 2018

Treasure to Trash! What??


I decided the other day that my trash can in the studio just wasn't right for my decor.  I took a trip to a local thrift shop and came home with a couple of treasures.  This pail was one of them!  I pulled out my vinyl and created the perfect trash can for my space!


I had to doll it up with some Spring florals for Easter!


To make the trash pail you'll need:
  • Styletech Craft Vinyl Sheets: Transparent Glitter; Black #499TG, Dark Gray#497TG; Transfer Tape
  • Diecut machine
  • Dies for letters and numbers
  • Pail:  11" tall x 12" wide (at top); 1 pre-painted
  • 3/8" ribbon (holes were in pail where bale wire would go); two 12" pieces
  • Scissors

Directions:
  1. Clean the surface of the pail.  If you find a good one that needs a paint job first; a good acrylic spray paint will work nicely.
  2. Choosing the right size for your letters and numbering:  Make sure to get the right size by cutting your font and numbers from regular paper or cardstock before cutting from the vinyl.
  3. Adjust the pressure on your die cut machine to accommodate vinyl.  If this is your first time using vinyl; I would suggest a good youtube training video on how to use the transfer paper and "weed" the vinyl that won't be used.  Here is a video that I found helpful:  youtube tutorial for working with vinyl


4.  Position and transfer the letters, numbers and design to the surface of the pail. Rub over the letters to adhere and remove any air bubbles.  Make sure the vinyl is well attached before removing the transfer paper.


Now the File 13 is ready to go!  I would suggest adding a liner bag to keep your trash can clean!  


Enjoy!

Sources for Styletechcraft vinyl:  

st- ATSM Craft your contact will be Peggy Suddath. Website is www. ATSM CRAFT she services FL, GA, SC, MS, AL.
Next we have Denver Sign Supply they service the westcoast. Contact number 225-654-3693 website: www.Vinyl&Crafts.com

Lastly we have Mid South Crafting they service the east coast. Their website is www.midsouthcrafting.com 615-462-5918

Thursday, March 29, 2018

Anybody Organized Challenged? Deflecto to the Rescue!


Spring is here!  Time to get organized!


I am building my storage over time.  Your personal storage can be built around your shelving or attached to the wall.  There are brackets to hang the multi-bin storage to give you more space.  My studio is full to the brim and it will take me time to get everything under control!  I love my Deflecto storage for getting my supplies organized!

For getting your Spring cleaning started you will need:
  • Deflecto Interlocking Multi-Bin Storage Organizer:  5 Bin Unit #20503CR; 6 Bin Unit #20603CR
  • Deflecto Sign Tags with chalk pen #899112RT
  • Washi Tape:  black and white, 1" wide
  • Scissors    

Before

1.  Unwrap the interlocking bins.  Follow the instructions and attach one bin to the other.

2.  Use a white label that comes with the bins to create the black labels that can be written on with the chalk pen.  How?  Measure and mark on one black sign tag the size of tag you will need.  Cut out using a sturdy craft scissor.  Slide into the slot on the front of the bin.  Use the chalk pen to write on the black label that you made.  Repeat for each bin. *Note:  Look closely at the bottom photos and you can see my chalkboard labels.  I haven't written on them yet.

3.  Apply the washi tape in rows to the white top surface of the top unit.  Refer to the photo given below and apply tape to the ridge at the top of each bin.  Fold under or trim excess tape.

4.  Repeat for the bins on the bottom row of storage.  

After


You can find Deflecto products at Amazon and at most major craft stores.

Happy Organizing!


Monday, March 26, 2018

Personalize a Step Stool and more!


Hi friends!  I am learning how to use adhesive vinyl sheets. Personalizing and decorating  multiple surfaces is fun!  

I am using the polished metal vinyl by Styletech Craft.  They have many exciting vinyls and a color for every kind of project!

Today I decided to personalize my studio step stool. This item has had a way of growing legs and walking away.  There won't be any doubts now about who it belongs to and where it should reside!  I could probably have stopped after applying the word "studio", but I wanted to do more!

Read on and I will tell you how I did it!


Materials I used:

Tape Technologies (Styletech Crafts) Vinyl:  Ruby #435HM; Silver #493HM
Step Stool:  Collapsible black step stool with white polka dots on top
Transfer Tape
Pick Tool: For weeding vinyl
Scissors
Die-cut Machine
Dies or download:  Fonts for alphabet letters
Rubbing alcohol
Cotton balls


Instructions:

1.  Gather the supplies.  Check the width and height of the area you are applying vinyl to.  Make sure your cut vinyl will fit in the chosen area.  Wipe the surface clean with rubbing alcohol using the cotton ball.  It doesn't hurt to pre-cut your letters on regular paper to make sure you are getting the correct size before cutting your vinyl.


2.  Cut a piece of transfer tape to fit over the top (right side) of the vinyl.  Smooth the transfer tape over the vinyl.  Use the Pick Tool to weed the release paper and vinyl away from the main design. There are many videos online if you have not done this step before.  After you weed the unwanted vinyl, you will place the sticky side down on the prepared surface and smooth it in place.  Remove any air bubbles and carefully remove the transfer paper. Your beautiful design should be revealed.


 I hope you got some inspiration here today.  This is what I would consider a beginners project.  This craft can be addictive so be warned!

BONUS!

In the spirit of Valentine's Day, here is another idea!  A bottle decorated with vinyl!


Make sure to take time to enjoy the small blessings along the way and;

Live Life with a Flourish!

Marilyn


I have rec'd complimentary product in exchange
for sharing my creativity on this blog.