Friday, July 12, 2019

Wedding Candy Bin with Joy

What is a wedding without sweets, right?  I have a great idea for using a craft storage bin and Joy® embroidered letters to serve up treats for the wedding guests.


I used the 3" Joy® black collegiate letters.  They have an adhesive on the back side that is meant to be temporary; as the permanent adhesive is heat activated.  In this case; I removed the release paper from each letter and applied one to each bin to spell "CANDY".  You should be able to remove them after the wedding and use the bins for craft storage.

You will need:

Joy®:  3" black embroidered letters to spell CANDY
Deflecto:  Craft Tilt Bin by ; a 5 bin unit
spray paint for use on acrylic plastic, black (or color of your choice)
trim:  single strand faux rhinestone self-adhesive
scissors
painters tape


Instructions:
  • Remove the bins from the unit.  Line them up on a flat surface.  Remove the release paper from one letter, center and apply to the bin.  Leave it loose until all of the letters are lined up evenly. Repeat for each letter.


Close-up View below
 
  • Tape off all areas you do not want to apply paint to.  You may choose to leave the bin unit white.  That is perfectly OK!
  • Cover up any small holes with painters tape on the inside edges of the unit.
  • I applied clear packing tape across the front to protect the inside of the unit.  Then, applied painters tape around the front edges.
  • In a well ventilated area; follow the manufacturer's instructions and paint the entire unit with the exception of the inside.  Allow to dry thoroughly.  Remove the tape.  Reinsert the bins.


  • Each bin will have a slot and paper to identify what is inside.  Embellish the edges with the faux rhinestone trim.
If you would like to know how I made the mini faux cakes on top of the candy bin; check out the blog post link here:  http://marilyngossettdesigns.blogspot.com/2016/04/mini-wedding-dessert-with-smoothfoam.html

  Hope you got some inspiration for your next celebration.  I am going to do "BABY" with a four bin unit next!

Joy® iron-on embroidered letters are available individually or in full alphabet sheets in a variety of sizes, colors and fonts at your favorite craft stores.


Thursday, May 16, 2019

Tea Time Any Time


It is always time for tea!  Spring is here and we will be enjoying our yards, flowers and decks.  This fun project is perfect for a gift or for a lovely piece of decor to bring out at tea time!


You will need:

Joy® Embroidered Letters:  1" white spelling TEA
Jar Mug with Lid:  clear with embossed label area
felt:  sheet of dark pink; 1
ribbon:  5/8" sheer light green
flowers:  handmade paper roses; red, yellow, antique white with green leaves
               1" to 2" blooms
pencil
scissors
tacky glue
glue gun and glue sticks
stash teas, various flavors


Close-up view of the jar


Instructions:

1.  Flatten the felt on the table top and trace around the lid using a pencil. Cut out along the pencil line.

2.  Screw the lid onto the jar.  Apply glue to the lid surface and smooth the felt onto the lid.  This will secure the inner seal to the outer ring of the lid.


2.  Screw the lid onto the jar.  Apply glue to the lid surface and smooth the felt onto the lid.  This will secure the inner seal to the outer ring of the lid.


3.  Arrange and adhere the flowers to the lid using the glue gun.

4.  Adhere the letters spelling TEA to the front of the jar.


5.  Remove the lid and fill the jar with tea bags.  Replace the lid. Tie a bow around the neck of the jar to finish.

ENJOY!


Friday, February 1, 2019

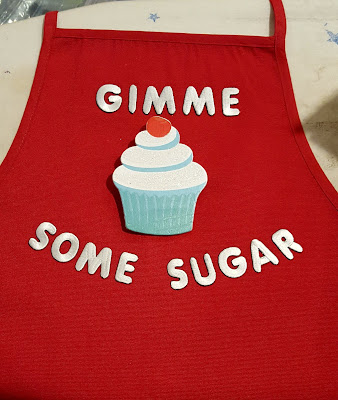
DIY Valentine's Apron for your February Occasions


Who doesn't want a little sugar around Valentine's Day?  Whether you are a chocoholic or just need a kiss and a squeeze, this easy DIY apron will bring some smiles to your friends and loved ones.


You will need:

Joy embroidered letters:  1" white; 2 packages
apron:  One size fits all; red
wooden cupcake:  pre-painted wooden cut-out
jewelry finding:  1-1/2" pinback
tacky glue

iron with steam
ironing board surface
pressing cloth


1.  Press out any wrinkles in the apron.  Lay out the letters in formation desired prior to applying heat.

2.  Apply heat to the letters, apply pressure to adhere.  I used a pressing cloth for this step.  Once the letters were set in place; I pressed it from the wrong side of the apron to insure adhesion.


3.  Cupcake:  Apply a 1-1/2"  line of glue to the middle of the wrong side of the cupcake.  Lay the pin back in place and allow to dry thoroughly.  Attach to the apron as shown.


Designer tip:  There are many pre-painted wooden cut-outs to choose from.  You can change out the image if you like!


Look for Joy iron-on, embroidered letters, letter sheets and floral appliqués at 
your favorite craft stores!