Friday, December 9, 2016

Holiday Foodie Friends


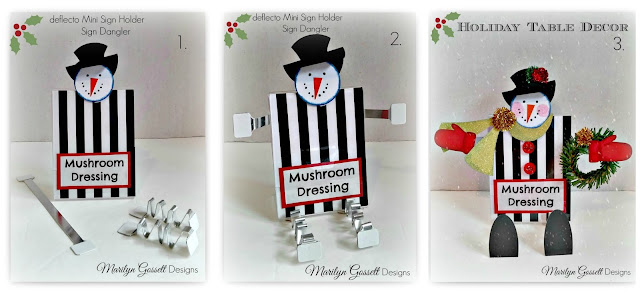
Jazz up your holiday parties and dinners with some of these place and food markers.

Deflecto has the supplies you need to create these little character nameplates and food markers.  Here is some inspiration to sweeten up your holiday entertaining!


Refer to the photo given below.  The sign danglers are used for the arms and the legs.  Punch out ovals as shown below and layer.  The head is a small candle light but can be replaced with a paper face.
I cut the pieces of magnetic craft sheet to fit on the flat part of the angled sign holder.  After adhering the white side to the sign holder; the magnet grip was used to seat the versagrip magnetic base.  A cookie created from die cuts was placed in the angled sign holder.  The clip will be used to insert a paper sign identifying the food that is being served at the buffet. 
Pictured below are the snowman and gingerbread nameplate holders.  I printed out a name and cut it to fit as shown.  


I hope you got some inspiration here today and enjoy a blessed Christmas and New Year!

Take time to enjoy the small blessings along the way and;

Live Life with a Flourish!

Marilyn


Monday, December 5, 2016

etchall'd Mirror Wall Hanging for Christmas

Years ago I discovered a wonderful etching product called 
etchall (R).  I had a space I needed to fill with a Christmas
decoration and decided to create my own. 
I gathered some materials and went to work!

To complete this project you will need:

etchall (R) products:  etching creme, squeegee, detail pick, etchmask    Link:  http://etchall.com/
craft mirrors:  three 6" high oval
wide burlap ribbon:  one yard, 3-1/2" wide
red burlap
fusible web
pencil
sheer ribbon:  one yard, 1-1/4" wide
1/8" red ribbon
jingle bells:  one 1-1/2", six 3/4"
Christmas spray pik
electronic die cutting machine:  Cut out 3" high letters spelling JOY
scissors
glue gun and glue sticks
tacky glue
paper towels

Instructions:

1.  If you have never used etchall (R)  products; then begin by watching this video.  Barbee will describe how to get started in her video.  http://etchall.com/getting-started/

2.  Cut out your letters from the etchall (R) etchmask.  Set aside.

3.  Clean the mirrors and dry thoroughly.  Remove the release paper from one letter. The letters I cut out had small circles cut within each letter.  I used the etchall pick tool to remove the tiny circles.  Remove the release paper from one letter.  Center the letter on a mirror and adhere.  Use the squeegee tool to remove any air bubbles.  Repeat for each letter.


4.  Follow the instructions given on the etchall(R) creme bottle and thoroughly cover the surface of each mirror with the creme.  Apply a thick layer; gently smoothing over the top with the squeegee tool.  *Note:  The creme has turned a dark shade of brown because it has been re-used several times.  This color does not change the effectiveness of the creme.  You will return the creme to the jar when you are done for another use!


5.  Let the etchall creme do it's thing.  It will take about 15 minutes.  When the time is up' scrape the creme back into the bottle for a later use, then rinse the mirrors, removing any residue.  Remove the etchmask and rinse again.  Dry thoroughly using a soft cloth.

6.  Burlap borders:  Apply fusible web to the back of a 14" square of red burlap; following the manufacturers directions.  Turn the burlap so the release paper is facing up and trace around each mirror leaving about a 1//2" space between each tracing.  Cut out around one oval leaving a 1/4" border.  Repeat for each burlap oval.

6.  Cut the piece of burlap ribbon.  Cut a V in the bottom end.  Fold under the top edge  and glue; making a 1" casing for the ribbon hanger.  Thread ribbon through the casing and tie the ends together making a hanger.

7. Glue the bells and Christmas picks to the top of the ribbon. Center and adhere the mirrors to the ribbon as shown. Thread the 1/8" ribbon tails through each bell, tying a knot after it to secure.  The picture below shows the wall hanging before the Christmas sprays were glued to the top.


8.  The photo below is about how your wall hanging should look when it is finished.  Personalize the wall hanging to match your own decor.  It is hanging in my "country room" with lots of traditional Christmas colors.  I have two more rooms I decorate with romantic country and elegance.  I would use different colors for those rooms.

I hope you have gotten some inspiration here today.  Be sure to visit the etchall (R) website to check out a plethora of awesome products.   I have only shown a few here today.

Make sure to enjoy the small blessings along the way and
Live Life with a Flourish!

Cheers!

Marilyn


Bring Joy with this decorated stacking storage container!

JOY TO THE WORLD!  Christmas is just around the corner and it is time to start thinking about the gifts we want to give and how we want to decorate.  I think everyone loves snowmen and Joy letters make gift giving fast and easy!  Everyone loves a message of JOY and you can bring others joy with the quick and easy design I am showing here today.


Materials:

defecto:  Interlocking storage organizer  #20101CR; sign danglers #20014CR
1-1/2" embroidered letters:  J O Y      Link:  http://joysa.com/
defecto:  Interlocking storage organizer; sign dangler
rick rack:  1/2" red
ribbon:  5/8" black & silver; 12"
candle light:  Snowman
adhesives
scissors
candy or gift to place in the container


Instructions:

1.  Remove release paper from the back of each letter and adhere to the canister as shown; one letter to each compartment.

2. Adhere a piece of ric-rac to the top of each compartment; not interfering with the lock.  Line up the seams in the back.

3.  Bend the sign dangler accordion fashion or as you would a fan.  Remove the release paper from each end.  Adhere one end to the top of the lid.  Adhere the candle light snowman to the opposite end.  This may take some extra adhesive to hold the light in place.

4.  Fill the canister with candies or other surprises for the recipient.  Finish with a bow under the chin!


EnJOY the coming holidays!  A gift from the heart is always a pleasure for the giver and the receiver.

Merry Christmas and may you have a very happy New Year!


Wednesday, November 16, 2016

Rinea Paper Foil for Christmas Crafting!


Here we come a-caroling!  We are halfway through November and onto December!  You need some quick and easy gifts and cards, right?  You have come to the right blog hop!  Our designers have lots of great ideas for you!
For the cards:
Rinea double-sided paper foil in gold and glue
Cricut Cuttlebug or other manual die machine
Embossing folders:  Christmas tree; Snowmen with snowflakes
Punches:  Corner trimmers, Corner shapes
Ribbon:  1-1/4" sheer off-white
Plain greeting cards:  5 x 7"
Envelopes
Adhesives
Scissors

For the ornament boxes:
Paper trimmer
Cardstock
Box pre-made or box pattern
Ribbon
Adhesives
Scissors


The Rinea paper foil comes in many interesting color combinations including bold, pastel, and metallic colors with glossy and embossed finishes giving you lots of options to play with and combine. Please go to our product store to see the different sizes and color combinations available.  http://www.globalcrafting.com/

Below is a visual tutorial of how to make some cute gift box ornaments.  Add a hanger and put them on the tree or give them as a gift.  The recipient can reuse the box as an ornament or re-gift it.  The roses are a circle cut in a spiral and then rolled into a flower.  The foil is double sided so it makes beautiful flowers.


I hope you have enjoyed the blog post and got some inspiration here today.  

Make sure to enjoy the small blessings along the way and,

Live Life with a Flourish!

Marilyn


Visit the store at:
http://www.globalcrafting.com/


Tuesday, October 25, 2016

Fall & Halloween Treats!


T'was the night before Halloween.....and all through the house...there was a whole lot of stirring....but not by a mouse!

We like to "Boo" our friends and neighbors anonymously with treats every year.  Here is an inexpensive treat bottle that can be decorated and filled with candies for that special friend to enjoy and display.


You will need:

Joy Embroidered Letters:  1" orange letters spelling BOO      Find online here:  http://joysa.com/
etchall(R):  dip'n etch etching liquid
Smoothfoam:  1-1/4" ball
plastic liter bottle:  Cut off the top
acrylic paints:  DecoArt Americana in Persimmon, Flesh Tone, Milk Chocolate, Lamp Black, White
paintbrush:  3/4" flat, #3 round
cardstock:  scrap of green
jute string
adhesives
green embroidery floss

Tools:

scissors
paper punches: 1-3/4" circle; 1/2" circle
hot wire foam cutter or knife
permanent marker:  black ultra fine point
Water bucket and paper towels


Instructions:

1.  Head:  The smooth side will be the face.  With that in mind; cut a small rounded portion from the bottom of the Smoothfoam ball.  Adhere the flat side to the top of the bottle cork.  Set aside.

2.  Fill the bottle with something to weight it.  I used smooth decorative round stones.  Set the bottle in the open part of the 2 liter bottle.  Fill up to the bottle neck with water.  Remove the bottle. Using a black marker; mark the water line on the outside of the bottle. Pour out the water. You will fill up to this line with dip 'n etch liquid.

3.  Insert the clean bottle into the dip 'n etch.  Set the timer for 15 minutes.  When time is up; remove the bottle from the plastic liter bottle and rinse.  Pour the etching liquid back into the original bottle.  It will be good for many uses.  If it turns a dark color, that is OK.  It is still good for another use.


4.  Paint:   Paint the head and cork Fleshtone.  Allow to dry.  Refer to the photo given and paint 2 small White circles for the eyes.  Let dry.  Apply a tiny Black dip dot to the center of each eye.  Use the black pen to outline the whites of the eyes, draw the nose and the mouth.  Draw the teeth; then paint White.  Paint the bottle Persimmon.  Allow to dry and then shade using the Milk Chocolate.

5.  Hair:  Wrap jute twine around one hand about ten times.  Slide off of hand and cut the loop at each end.  Tie an extra piece of twine around the middle and knot to secure.  Glue to the top of the head.

5.  Hat:  Punch a 1-3/4" circle and a 1/2" circle from the green cardstock.  Cut a 1-1/2" x 3" rectangle of the same cardstock.  Roll it into a 1/2" x 3" cylinder.  Adhere the small round punch to the top of the cylinder. Glue the opposite end to the top of the circle.  Glue the hat to the top of the hair.

6.  Finish:  Tie embroidery floss around  the top of the hat crown as shown.  Tie another piece around the bottle neck and finish with a shoestring bow.  Adhere the letters to the front of the bottle.  


7.  Have a spooky good Halloween!


Note:  I receive a small stipend  in return 
using my creativity to show embroidered
letters by Joysa.


Sunday, September 25, 2016

etchall(R) for easy Halloween glass painting!

 Trick-or-Treat!  Give me something good to eat!
October is just a few days away!  I love decorating the house for Fall and planning my Halloween treats and gifts.  It is always best to make more than one and luckily the supplies can be found at your local craft store or online!  I will be showing how to use etchall(R) dip 'n etch liquid to get a great paint job on glass!

I use etchall(R) products to etch my glass before painting. Preparing the glass for paint will make the job go much easier and you will be very happy with the results. The etchall(R) gives tooth to the smooth texture of the glass which grabs the paint.  This makes the paint go on smoothly and evenly.  Read on and I will tell you how I do it!  The picture below are the projects I created using etchall(R).  Batilda and her minions!

BATILDA AND HER MINIONS
You will need:

etchall(R):  dip 'n etch liquid    http://etchall.com/
2-Liter plastic bottle with top cut off
Glass Bottle:  Heart shaped with a cork (the largest here is 8" tall with the cork...the smaller ones are 5")
Acrylic Paints:  Orange, Black, Teal, Brown, Yellow, White, Fleshtone, Green
Paintbrushes:  3/4" flat, #3 round
Stylus or toothpicks
Smoothfoam:  1-3/4" ball (small bottles); 2" ball (large bottle)
Permanent Marker:  Black with a fine tip
Cardstock:  black and dark green
Pom-pom:  1" Black
Wiggle eyes:  two 1/8"
Jute twine
Joy embroidered letters:  1" spelling BOO
Hot wire foam cutter or knife
Adhesives
Scissors
Water bucket and paper towels
Marbles:  Smooth flat decorative (for weight)

5" tall bottle with 1-1/4" Smoothfoam Ball
Directions:

1. Remove the cork from the bottle.  Cut the rounded bottom off of the Smoothfoam ball.  Adhere the flat side of the ball to the top of the cork.

2.  Etch:  Fill the glass bottle up with marbles for added weight.  Set the bottle in the plastic liter bottle.  Fill with water up to the neck of the glass bottle.  Remove the glass bottle and make a mark on the outside of the plastic bottle at the waterline.  Dump the water.  Put the bottle back in the plastic container and fill it to the ink mark with the dip 'n etch Liquid.  Set the timer for 15 minutes.

etchall dip 'n'etch liquid, smooth marbles for weight and a converted 2-liter bottle

3.  When the time is up; remove the bottle from the dip 'n etch liquid.  Empty the stones; rinse and dry.
Pour the dip 'n etch back into the original container.  The product is still good even after it turns color from other uses.  The picture above shows how mine has turned darker.  It still works very well.

Pumpkin Minion candy container

4.  Head:  Paint the head and cork (neck) Fleshtone.  Allow to dry.  Paint small white circles for the eyes.  Apply a tiny black dip dot in the center of each eye.  Draw a nose and mouth using the black marker.  Outline the eyes with the black marker.  Paint the teeth white.  Refer to each image to copy details for the face. Paint the bottle orange and highlight strokes (float) of brown.

5.  Below:  Head:  Follow painting instructions given above; add eyelids and paint teal.  Draw the nose and mouth; fill in with black and paint the teeth white.

6.  Batilda Bottle:  Paint the bottle as shown; leave a clear space down the front to show the candy that is inside. Paint a black cape and apply white dip dots using the eraser of a new pencil.  Use a toothpick to dot the center of the eyes and for getting into small spaces.

Batilda candy container

7.  If you are new to drawing faces....practice first by drawing on a piece of paper.  The eyes are circles; the nose is a U and the mouth is like a crescent moon on it's side.  Use a light touch when you add the features to the face.  I will paint my hair on first; being careful to leave plenty of room for the face.  Use a pencil to draw on the features after the Fleshtone paint has dried.  This will help with placement and you will have success!

8.  For Batilda's head piece:  Fold a 3" x 6" piece of black cardstock in half, matching the short edges.  Draw one bat wing up to the middle fold.  Cut out; unfold and glue the pom-pom to the fold.  Glue the wiggle eyes to the pom-pom.  Glue to the top of her head.

Bespeckled Minion candy container

9.  Follow instructions #7 to draw this minions face using the photo given.

10.  Put your own special touches on these minions and their master!  I think they are fun and silly and I hope you got some inspiration here today.  I enjoy getting comments and questions.  Please leave them below if you have one!


We will all be raking up a lot of leaves this next month.  I hope you are enjoying your Fall weather!

Make sure to take time to enjoy the small blessings along the way, and

Live Life with a Flourish!

Marilyn


Note:  I receive a small stipend for sharing my
creativity to showcase etchall(R) products.

Tuesday, September 6, 2016

Corner Shelf Make-over!

Hi everyone!  I just finished a fixer-upper project that I have been procrastinating on for several years.  My corner shelf was plain and served it's purpose; but it was not pretty!  Here is a picture after I cleaned it up and before I got my paints out.

See?  It is a cute shelf, but very blah!

Here is what I did to transform my shelf!

Supplies:

Waverly Inspirations Chalk Acrylic Paint:  Agave #60685E; Ivory #            ; Matte Varnish or Wax
Waverly Inspirations laser stencil 6" x 6":  Damask #60530E
Waverly Inspirations stencil brush:  5/8"
FolkArt Milk Paint Brush by Plaid:  1-1/4"
Painter's Tape
Paper plates
Paper towels
Water container


Instructions:

1.  Sand and wipe clean all wooden surfaces.

2.  Base paint the entire shelf and allow to dry.

3.  Position and tape down the sides of the stencil.

4.  Apply the Ivory paint with a pouncing (up and down) motion to apply pattern to the top shelf.
Repeat with the remaining shelves; lining up the pattern.  Allow to dry.

5.  Seal with Varnish or Wax.


Enjoy your "new" piece of furniture!  If you have comments or questions; please leave them below!

I hope you got some inspiration on the blog today.  If you would like to try out the new Waverly Inspirations Chalk paints; they are available at your local Walmart store.

Make sure to take time to enjoy the small blessings along the way; and

Live Life with a Flourish!

Marilyn


I received free product in exchange for
my creativity on this post.  There was no 
financial gain.


Friday, August 26, 2016

Wedding Preview and More!

August was a month of joy and tears.  We had a wedding for my daughter and a memorial service for my beloved mother. 

I am going to focus on the joy of the wedding in this post and share some pictures from the process.  These are photos taken by attendees at the wedding. We have some professional photos coming but I think it is fitting to show the spontaneity of the photos I show here today.


My daughter; Lauren Ashley Gossett, who is our only child, married Matthew Ivan David White on August 13, 2016.  The planning started a year before the wedding took place.  The venue was the Filbert Farm (the home and property of her in-laws, the Goodwins) and everything was fixed up and rearranged for the wedding.  And...since it was DIY, I had a large part in the decorations; the dance floor was Lauren's idea and the families made it come to fruition with elbow grease and lots of talent.  Lol.

The photo shown below is the woodshed as it is being converted into the Bar.  You would not believe the transformation.  It was a great success...we had 2 lovely bartenders and this was the cool spot to hang out!

Before picture of the Bar:
After photo!  A little magic by Jim Goodwin and Matthew White!


The next photo was taken next to the woodshed.  This became the fire pit area with chairs circling the fire area.


Next is another shot of a side yard just to show you the before....all the hard work!


The next photo was taken right after the dance floor was finished and the lights put up.  The Kereoke disc jocky set up right in front of the side we are looking at here.


Whoops!  I am getting ahead of myself....but I had to show the contrast between the preparation and the real deal!  It was sweet!


The next photo is of the open area where the reception took place.  The flowers weren't on the tables yet.  I hope to get a picture of that!  They were beautiful.  The roof to the right is the bar area that was shown in the other photo.


Below is another contrast photo!  Here is part of the crowd that filled up the tables.  The food was wonderful and all prepared by dear friends.  The service and food were absolutely A+!


Here is Matthew at the alter (so to speak) with Pastor Rob.  Looks like pastor is giving him some last minute instruction and/or bravado!  That is the Wisteria overhead and it was beautiful!


The procession has started and here comes Harmony, the flower girl!  I think this may have been our only glitch in the whole day.  We forgot the real rose petals from my house  and she threw the fake ones.  Oh, well....


I don't have photos yet of the bridal party coming down to the alter; but then....HERE COMES THE BRIDE!  Lauren's dad walked her down the isle to the tunes of a special song....of which I can't remember the title.  It was a Disney tune with a dramatic impact.  I will have to check on that one!  My girl was radiant!

Here they are with Pastor Rob, saying their vows which they both had written.


The ring exchange......and a prayer of blessing......


The KISS!  Well, one of them anyway.......

Bobbie is the family cake maker and she didn't disappoint.  Lauren's colors were teal, black and white and pale gold.  We had cake and cupcakes and they were beautiful!
Cutting the cake...and first bites.  They both behaved themselves.  I think they had a prior agreement.  No cake in the face!


Meanwhile....back at the dance floor; first dance was being performed and the bridesmaids and maid of honor are in the background.


It was a hot day and Jamie escaped his dress clothes before I could catch him!  Here are Lauren and Matthew dancing with their Dad and Mom.


Jamie (Lauren's dad), surprised everyone with a song he sang called "I Loved Her First."  Have you heard it?  We had to listen to the recording of the song numerous times before we could stop getting teary eyed.  I told him he had better learn it forwards and backwards before he actually sang it to her.  He got a little choked up while singing...but made fast recoveries.  We heard a LOT of sniffling going on.  It was a beautiful and bittersweet place in time.  Lauren has always been a daddy's girl....I am attaching a few old photos just to show you some of what was going through my mind as he sang.......

Of course there are many more; but I think you get the idea.  Sniff....sniff..... This has continued throughout the years...to this day, in fact.  Well...let's say she still depends on her dad to be there for her!

This is all I have to share about the wedding for now.  I will create another blog with the pictures that were taken by our dear friend and professional photographer; Brian.  It helps to have BFF's who are the best at what they do.  Brian's wife Cindy....my BFF; put all of the flower arrangements together for the tables.  Also Lauren's bouquet of dahlias.  The dahlia fields are very beautiful this time of year.  But, that is another story.

Did you happen to miss the blog for her Bridal Shower?  It was DIY and the theme was The Mad Hatter's Tea Party!  If you would like to see it too....here is the link! 

NOW!  For my crafting friends.....don't leave and I will show you some of the DIY projects I put together for wedding decor, etc.  I will give blog links for instructions if I have them!

For the Bag:  http://marilyngossettdesigns.blogspot.com/2016/06/a-bag-of-joy-for-bride.html


For the Candy & Nut Caddy:  http://marilyngossettdesigns.blogspot.com/2016/06/build-treat-station-with-deflecto.html
No instructions for my wedding invitations....they had pockets inside with all of the info......


Luggage Tags:  Blog post with instructions not available to view yet......


Thank you for taking the time to share in these highlights from the wedding and a little slice of our lives.  It has been a wonderful time!  If you have any questions about the projects or something we did at the wedding I like getting questions and comments and you can comment below.

Make sure to take the time to enjoy the small blessings along the way and

Live Life with a Flourish!

Marilyn


A special thanks to Caron & Traci for sharing all of your photos!
And of course to everyone who was involved in any way to
make this the best day of our kid's lives......and ours!  xoxo