Monday, February 13, 2017

Creativation Phoenix 2017


Having lived in the Valley of the Sun for many years; I was excited to come back to my old stomping grounds.  Some amazing changes have taken place since I lived there; one of them being the expansion of the Phoenix Sky Harbor Airport which is now the 5th largest in the United States.  The days of the single terminal are gone!  I love the palm trees, cactus and sunshine.  Even though the sunshine stayed hidden for most of the trip!


Next is a picture of our hotel from the 11th floor.  A beautiful view!

Outside the hotel at the bus stop.  It was really nice when the bus showed up.  Sometimes it didn't; and I was caught hailing a cab.
Designer Sue Eldred was first up on Saturday for the Make 'n Takes.  Deflecto has many products that make a wonderful surface for a plethora of craft projects.  Sue designed a very cute little desk calendar for the class.  A good time was had by all!
Here is another broader view of the Deflecto Make n' Take table.  All of the gray shirts are the Deflecto Team members.  You won't find a more wonderful group of people!
Designer Monica Taylor was a member of our first Deflecto Design team.  Many times we don't get to meet our design team members in person until we are at a trade show.  It was a pleasure getting to meet Monica.
Below is "Coach" Pat Foley of Deflecto fame.  He keeps things hopping in the Deflecto booth with the deflecto caddy challenges and is a gracious host to anyone who visits the booth.  We kinda like him.
There is always something going on in the Deflecto booth.  Charity Wings came by for a visit and did an interview with Pat.
And the winner is..............................................Pat.
Got a photo op with some more of our Deflecto team.  Ken, Mark, Chris and Rich.


Our deflecto design team members all love Jesika!  She sends out our monthly product boxes and always makes it personal, crafty and fun!  Thank you, Jesika!


Coach Foley prepping between Caddy Challenges.  He is really good at this!  The grand winner went home with $350.00!


I taught the Make 'n Take on Sunday.  We made wet erase sign boards from one of the deflecto frames.  I always love to see the creativity of each participant.  They always make the project their own and inspire others with their ideas!
Here is another lovely project by one of our Creativation attendees!


There were caddys stacked up on each side of the booth.  Lucky ticket recipients got to take one home after the show.  There were 400 free caddys given out at the show.  How cool, right??

The last day of the show.  Sue was on her way out and we ran into each other in the Plaid booth.  I was excited to see all the new product that Plaid has this year.  I am looking forward to working with some of it!


As you can see by this point....I did NOT get out of the booth much this year.  When I was out; I had hurting feet and just couldn't get around the entire show.  I couldn't resist these gorgeous paper flowers though.  I love making paper flowers of all shapes and sizes and these beauties shown here are making a BIG statement!


I also got a peek at Canvas Corp.  Their booth was right behind Deflecto and they always have wonderful products!  Fun and inspiring!

Marilyn, Pat, Tammy and Anita.  Thanks Anita for sharing your pic!


From what I could see; journaling, embellishments, textures and memory papers are still huge.
Paints, surfaces, organic and vintage are still prevalent.  Upcycling and DIY will be around for a long time!  

This is the 4th year since Deflecto joined the crafting industry.  They continue to create and innovate with new products.  The products are geared toward craft storage and event signage. What a great company with wonderful people.  If you haven't gotten to know them; make sure to check out the website and plan on stopping by their booth next year!

Make sure to take time to enjoy the small blessings along the way,
and
Live Life with a Flourish!

Marilyn


Monday, February 6, 2017

Protect your memories with a personalized mini album deflecto

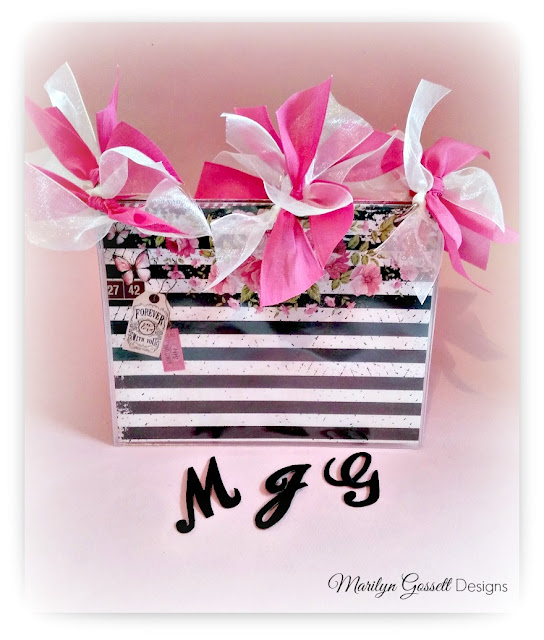
Joy embroidered letters are perfect for adding a personal touch to just about anything.  I created a mini album using plastic pouches, memory papers, binder rings and ribbon!  The embroidered monogram letters added a touch of class to my album.  The letters are available at Michael's stores and on the Joy website!

I liked the papers best in a landscape configuration for my mini album.

However; portrait looks good too!  It is up to you.  Your photos and journaling will determine how you want to proceed.

Materials:

JOY embroidered letters:  1-1/2" monogram   Website:  http://joysa.com/
pad of coordinated memory cardstock
deflecto plastic pouches:  6" x 7"    Website:  http://www.deflecto.com/craft/
offray ribbon:  pink and cream sheer; 1-1/2" wide
metal binder rings
adhesives
scissors
paper trimmer
photos, ephemera, pens, etc.

Photos of materials

Instructions:

1.  Cut the papers to fit the plastic pouches.  Decorate each side of the paper with journaling, ephemera and photos to your satisfaction.

2.  Insert the finished page into a pouch and repeat for each one.

3.  Prepare the pages for binding by punching a hole in the same place on each side of the middle hole.
When pouches are all finished; line up the punched holes for binding and insert a binder ring in each one.

4.  Cut ribbon in 3" lengths and tie one pink ribbon around the binder ring. Repeat with the cream sheer ribbon.  Rotate colors of ribbon and fill each ring with ribbons.

5.  Adhere the monogrammed letters to the front of the album using an all-purpose glue.  Use a toothpick to apply adhesive to the wrong side of each letter and be careful not to get any glue on the plastic pouch!

There are a plethora of paper patterns and matching embellishments.  Have fun choosing patterns and colors to really make your mini album personal!


Make sure to take time to enjoy the small blessings along the way and,

Live Life with a Flourish!

Marilyn


I am compensated with free product
in exchange for sharing my creativity on
my blog.


Wet Erase Notepad for your Sweetheart


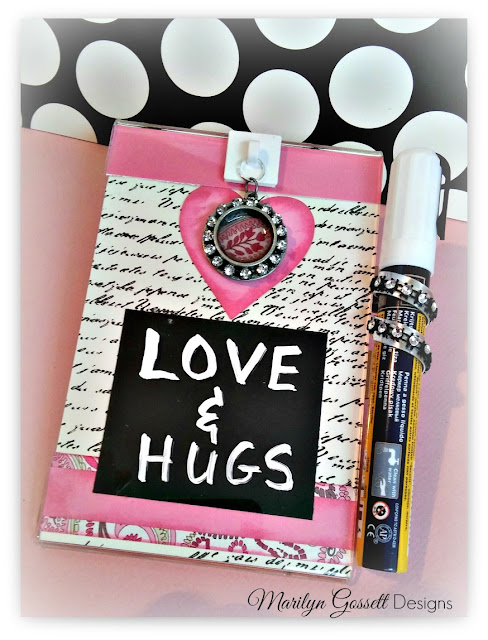
Each deflecto clear acrylic craft frame is a blank canvas! They are extremely versatile to be decorated and embellished and used  as decor and/or signage for special events. 

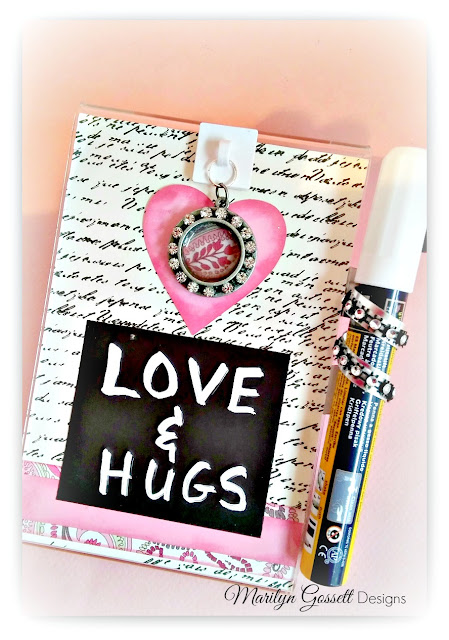
 With Valentine's Day around the corner; I made this one into a wet erase sign that can be used over and over with whatever you would like to write on it! 


Materials:

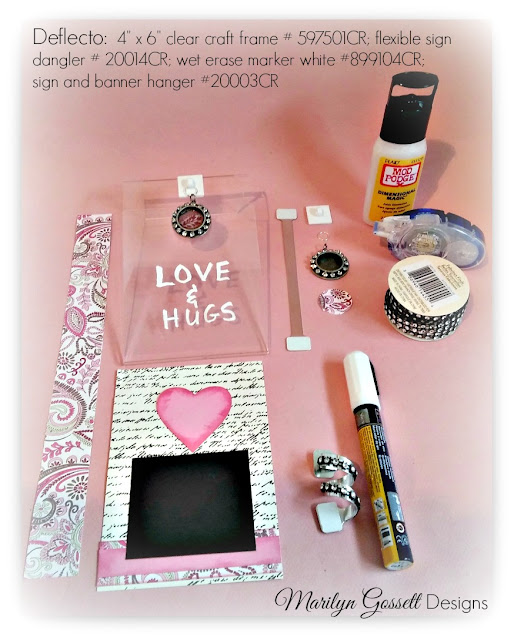
Deflecto:  4" x 6" craft frame; flexible sign dangler; banner hanger; wet erase marker
jewelry findings:  round rhinestone frame with jump ring; 1/4" silver jump ring
trim:  faux rhinestone trim with self adhesive back
paper punch:  1" round
dimensional medium: (Mod Podge Dimensional Magic)
cardstock:  pink, black, vintage white with black writing
adhesives
paper trimmer
scissors
ink to chalk the paper edges


Instructions:

1.  The frame will lay flat with the "bottom" as the top and the "top" as the bottom.  Cut the paper and adhere the layers as shown.  All of the paper will be on the inside of the frame, between the front and back panels.

2.  Remove the release paper from the banner hanger and attach to the top.

3.  Apply one drop of the dimensional medium to the inside of the jeweled frame.  Press the paper circle into the frame and hold down until it is flat.  Let dry in place.  Apply more dimensional medium to the inner circle and allow to dry flat.

4.  Attach the jeweled frame charm to the large jump ring and then attach the jump ring to the banner hanger as shown. 

5.  Marker:  Bend the sign dangler around the marker.  Remove the pen and make sure the ends will fit between the panels of the frame.  Remove the release paper from the dangler ends and adhere to the inside panels of the frame. Embellish:  Cut a single strand of faux rhinestone trim and adhere it around the sign dangler as shown.  Re-insert the marker into the pen holder that you just made.

6.  Write on the outside of the frame with the wet erase marker.  The writing can be removed with a baby wipe or with a wet paper towel.  

7.  Since Valentine's Day is just around the corner; I wanted this one to be fitting with the holiday.  Use your imagination and embellish the frame any way you like to fit with your decor at home or office.  Enjoy!


I hope you got some inspiration here today. 
Make sure to take time to enjoy the small blessings along the way, and

Live Life with a Flourish!

Marilyn


I receive complimentary product in exchange
for sharing my creativity on this blog.