Showing posts with label deflecto crafts. Show all posts

Monday, October 9, 2017

Thanksgiving Signage made easy with deflecto!

Thanksgiving is just around the corner.  deflecto has a product to help with any and every aspect of holiday entertaining.  I used slanted sign holders and sign danglers to complete my beautiful signage created for my Thanksgiving dinner.  

Sometimes it isn't what you see; but what you DON'T see that makes something great!  The first rule of craft designing is to not let the mechanics that are holding a design together, show!  I created my paper pumpkins and flowers using my electronic die-cut machine.  I stamped the sentiment on the front of the pumpkin with a rubber stamp that I like.  Here is what you will need:

Materials:

deflecto:  Mini Sign Holders, 2" x 3"  #20005CR
               Sign Danglers, #20014CR
Cardstock:  Terracotta, Orange, Red, Green, Yellow  (Fall colors); White
Inkpads:  Coordinating colors to cardstock 
Sponge Applicator
Die-cut Machine
Dies:  Pumpkin, Maple Leaf, Flowers
Rubber Stamp:  Blessed
Adhesives: 3-D Foam dots, Tacky Glue 
Computer and printer
Paper Trimmer


Instructions:

1.  Refer to the photos given.  Cut out the pumpkins (these are 4" wide x 3-1/2" high).  This will apply to whatever shape you cut out as your main shape.  The maple leaf is 4-1/2" wide x 5-1/2" high.

2.  Cut out the flowers.  The largest flower is 2" wide assembled, and the smallest is 1".  I used a die cut on the electronic machine.  For this step you could substitute mulberry or silk flowers purchased at the craft store.  

3.  Adhere the leaf to the back side of the pumpkin with the top half of the leaf extending above the top of the pumpkin.  Arrange and adhere the flowers to the pumpkin as shown.

4.  Adhere the finished pumpkin to the front of the mini sign holder using 3-D adhesive.  Refer to the back view given in the photo above.


5.  Sign Dangler:  Bend one end of the sign dangler so the adhesive is facing down.  Remove the release paper and adhere to the base of the mini sign holder.  Leave the other end straight with the adhesive pointing toward the back of the pumpkin.


6.  Print and cut out a 3" square sign.  I like to use the free program PicMonkey.com to make my signage.
Remove the release paper on the end of the sign dangler and adhere the wrong side of the paper sign.
Voila!  Now you can make as many of these as you like as food identifying signs, place cards, etc.  You don't see the magic, but it is there!  I used these four as food identifiers for my meal.  


Thank you for stopping by my blog.  I always appreciate questions or comments in the area below.  I hope you got some inspiration here today and are enjoying the wonders of Fall!

Make sure to take time to enjoy the small blessings along the way, and

Live Life with a Flourish!

Marilyn


Monday, March 6, 2017

Spring Crafting! Much more fun than cleaning!


A wooden frame, a little paint, some bottle caps, AND some magnetic craft sheets!!  Yep!  I transformed this inexpensive wooden frame into a magnetic surface that has some serious playful possibilities!


Read on, and I will explain.  My first idea was to make this a magnetic frame with various magnets that could be moved around on the frame.  I gathered up some bottle caps that I had previously decorated and some wooden flower shapes.  I had an idea while doing this.... thinking that individual pictures of the family members could be punched out to fit inside the bottle caps....and a family group picture could be placed inside the frame. That was a different idea from what I was doing; but I still think it is a good one!

I chose to make my wooden flowers into magnets and glue the bottle caps to those; but imagine the possibilities with different shapes and themes.  So, here are the items that you will need:

Supplies:

deflecto:  magnetic craft sheets:  #5901
Wooden Frame:  unfinished 8" square from craft store
Wooden Flowers:  3-3/4" wide x 1/8" thick; 3
Wooden sentiment:  unfinished 1" high x 4" wide word "Create"
Bottle Caps
Dimensional medium:  Clear
Matte Chalk Paints:  lt. pink, beige, teal
Adhesive
Paintbrush:  1" flat
Pencil
Scissors
Water container
Paper Plate
Paper Towels


Instructions:

1.  Lay the frame face down on the white side of a magnetic craft sheet.  Using a pencil; trace around the outside and inside edges of the frame.  Cut out.  Set aside.

2.  Paint the frame and flowers.  Let dry thoroughly.  Adhere the white side of the magnetic frame cut-out to the top (front) side of the frame.  Repeat with each of the flowers.

3.  Paint the wooden word beige.  Adhere to the top corner of the magnetic frame.

4.  Punch out images of family members or other digital art.  Adhere the wrong side of one image into one bottle cap.  Smooth out any air bubbles.  Repeat for each one.  Let adhesive dry.

5.  Apply the dimensional medium over the top of each image in each bottle cap.  Allow to dry thoroughly.
Glue one to the center of each flower.

6.  Each magnet should clamp to the frame.  Sometimes you will have to adjust them a little before you get a tight fit.  These magnets can also be displayed on the refrigerator or other metal surface.

7. Cut out and place your main image in the frame.  Enjoy!


I hope you got some inspiration on the blog today.  If you have any questions or comments you can leave them at the bottom of the page.  I enjoy hearing from you.

Make sure to take the time to enjoy the small blessings along the way and,

Live Life with a Flourish!

Marilyn


I receive free product in exchange
for sharing my creativity on this blog.


Friday, December 9, 2016

Holiday Foodie Friends


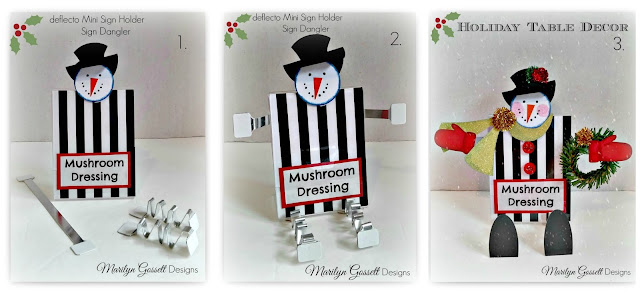
Jazz up your holiday parties and dinners with some of these place and food markers.

Deflecto has the supplies you need to create these little character nameplates and food markers.  Here is some inspiration to sweeten up your holiday entertaining!


Refer to the photo given below.  The sign danglers are used for the arms and the legs.  Punch out ovals as shown below and layer.  The head is a small candle light but can be replaced with a paper face.
I cut the pieces of magnetic craft sheet to fit on the flat part of the angled sign holder.  After adhering the white side to the sign holder; the magnet grip was used to seat the versagrip magnetic base.  A cookie created from die cuts was placed in the angled sign holder.  The clip will be used to insert a paper sign identifying the food that is being served at the buffet. 
Pictured below are the snowman and gingerbread nameplate holders.  I printed out a name and cut it to fit as shown.  


I hope you got some inspiration here today and enjoy a blessed Christmas and New Year!

Take time to enjoy the small blessings along the way and;

Live Life with a Flourish!

Marilyn


Monday, December 5, 2016

Bring Joy with this decorated stacking storage container!

JOY TO THE WORLD!  Christmas is just around the corner and it is time to start thinking about the gifts we want to give and how we want to decorate.  I think everyone loves snowmen and Joy letters make gift giving fast and easy!  Everyone loves a message of JOY and you can bring others joy with the quick and easy design I am showing here today.


Materials:

defecto:  Interlocking storage organizer  #20101CR; sign danglers #20014CR
1-1/2" embroidered letters:  J O Y      Link:  http://joysa.com/
defecto:  Interlocking storage organizer; sign dangler
rick rack:  1/2" red
ribbon:  5/8" black & silver; 12"
candle light:  Snowman
adhesives
scissors
candy or gift to place in the container


Instructions:

1.  Remove release paper from the back of each letter and adhere to the canister as shown; one letter to each compartment.

2. Adhere a piece of ric-rac to the top of each compartment; not interfering with the lock.  Line up the seams in the back.

3.  Bend the sign dangler accordion fashion or as you would a fan.  Remove the release paper from each end.  Adhere one end to the top of the lid.  Adhere the candle light snowman to the opposite end.  This may take some extra adhesive to hold the light in place.

4.  Fill the canister with candies or other surprises for the recipient.  Finish with a bow under the chin!


EnJOY the coming holidays!  A gift from the heart is always a pleasure for the giver and the receiver.

Merry Christmas and may you have a very happy New Year!


Monday, July 18, 2016

Down the Rabbit Hole for a Mad Hatter Tea Party!


I love celebrations, don't you?  I am all about jumping on an opportunity to come together with family and friends to share good times!  

We have a wedding in our family next month and the bridal shower is coming up very soon.  We decided to have a Mad Hatter Tea Party theme and I have been having so much fun making decorations and favors!  

Deflecto has a 3-tier dessert display that I love.  It is collapsible and is easy to assemble and store.  I hope you will get some inspiration here for your own celebration.  The cupcakes didn't get made in time for my post; but they will be displayed in black and white stripe cupcake baking cups.


The 3-Tier Dessert Stand comes ready to assemble with instructions.

Follow below to see how I made the fan for the display topper.
Die cut the scallop circles
Attach the finished fan with a deflecto grip clip as shown below.
Adhere glitter tape around the edges of the display shelves.


The stand has small round grooves to insert suckers or cake pops.  I tied some ribbon around the base of each sucker and adhered one to each playing card; the cards with hearts of course! I stood each sucker in the groove before adhering the card so they would be even with the platter of the display.

Ready to add cupcakes or other treats to the display!  I plan on putting nut cups and party favors on the other stands that I have.  NEXT UP!  The beveled edge frame that I used for some of the decor!

You will need a frame, a digital print-out of your choosing, and the following:
glitter trim tape
4 self-adhesive gems
key ornament with jute string hanger
self adhesive faux rhinestone trim
paper trimmer
black cardstock
hat pattern - **link
glue gun
tacky glue
scissors

1.  Cut out hat pattern from black cardstock.  Assemble.
2.  Remove the hardware from the frame and set aside.
3.  Trim the print; center and insert between the panels of the frame.
4.  Reattach the hardware with the large pegs at the bottom of the frame and the shorter ones at the top.
5.  Adhere the gems to the front of the hardware pegs; top and bottom.
6.  Adhere the glitter tape around the edges of the print as shown.
7.  Hang the key ornament off of the top right of the frame.
8.  Adhere the rhinestone trim to the crown of the hat.  Adhere the hat to the corner of the frame as shown.

You can find out where to purchase deflecto storage and craft projects at the following website:


Make sure to take time to enjoy the small blessings along the way and
Live Life with a Flourish!

Cheers!
Marilyn


**Pattern for Mad Hatter Hat


Copy and paste the pattern into a document and re-size it to fill up the page.  Leave 1/4" borders.
         Print out.