Showing posts with label #Deflecto Crafts. Show all posts

Monday, February 13, 2017

Creativation Phoenix 2017


Having lived in the Valley of the Sun for many years; I was excited to come back to my old stomping grounds.  Some amazing changes have taken place since I lived there; one of them being the expansion of the Phoenix Sky Harbor Airport which is now the 5th largest in the United States.  The days of the single terminal are gone!  I love the palm trees, cactus and sunshine.  Even though the sunshine stayed hidden for most of the trip!


Next is a picture of our hotel from the 11th floor.  A beautiful view!

Outside the hotel at the bus stop.  It was really nice when the bus showed up.  Sometimes it didn't; and I was caught hailing a cab.
Designer Sue Eldred was first up on Saturday for the Make 'n Takes.  Deflecto has many products that make a wonderful surface for a plethora of craft projects.  Sue designed a very cute little desk calendar for the class.  A good time was had by all!
Here is another broader view of the Deflecto Make n' Take table.  All of the gray shirts are the Deflecto Team members.  You won't find a more wonderful group of people!
Designer Monica Taylor was a member of our first Deflecto Design team.  Many times we don't get to meet our design team members in person until we are at a trade show.  It was a pleasure getting to meet Monica.
Below is "Coach" Pat Foley of Deflecto fame.  He keeps things hopping in the Deflecto booth with the deflecto caddy challenges and is a gracious host to anyone who visits the booth.  We kinda like him.
There is always something going on in the Deflecto booth.  Charity Wings came by for a visit and did an interview with Pat.
And the winner is..............................................Pat.
Got a photo op with some more of our Deflecto team.  Ken, Mark, Chris and Rich.


Our deflecto design team members all love Jesika!  She sends out our monthly product boxes and always makes it personal, crafty and fun!  Thank you, Jesika!


Coach Foley prepping between Caddy Challenges.  He is really good at this!  The grand winner went home with $350.00!


I taught the Make 'n Take on Sunday.  We made wet erase sign boards from one of the deflecto frames.  I always love to see the creativity of each participant.  They always make the project their own and inspire others with their ideas!
Here is another lovely project by one of our Creativation attendees!


There were caddys stacked up on each side of the booth.  Lucky ticket recipients got to take one home after the show.  There were 400 free caddys given out at the show.  How cool, right??

The last day of the show.  Sue was on her way out and we ran into each other in the Plaid booth.  I was excited to see all the new product that Plaid has this year.  I am looking forward to working with some of it!


As you can see by this point....I did NOT get out of the booth much this year.  When I was out; I had hurting feet and just couldn't get around the entire show.  I couldn't resist these gorgeous paper flowers though.  I love making paper flowers of all shapes and sizes and these beauties shown here are making a BIG statement!


I also got a peek at Canvas Corp.  Their booth was right behind Deflecto and they always have wonderful products!  Fun and inspiring!

Marilyn, Pat, Tammy and Anita.  Thanks Anita for sharing your pic!


From what I could see; journaling, embellishments, textures and memory papers are still huge.
Paints, surfaces, organic and vintage are still prevalent.  Upcycling and DIY will be around for a long time!  

This is the 4th year since Deflecto joined the crafting industry.  They continue to create and innovate with new products.  The products are geared toward craft storage and event signage. What a great company with wonderful people.  If you haven't gotten to know them; make sure to check out the website and plan on stopping by their booth next year!

Make sure to take time to enjoy the small blessings along the way,
and
Live Life with a Flourish!

Marilyn


Thursday, June 23, 2016

Decorate the Office with Deflecto!


Have you heard of Deflecto?  There is a good chance that you haven't heard the name, but there is also a good chance that you have used the products they manufacture! 

The frame, four drawer cube and nameplate are shown below.  The frame is acrylic with a black border, the storage cube is clear, and the nameplate comes in silver and black.  I have customized each one to fit with my design studio and I show how I did it below.


Nameplate is decorated with washi tape, rhinestone flourish, paper flower and pearl cabachon.
The faux rhinestone trim comes on a roll and has a self-adhesive back.
The frame is decorated with the same supplies as the nameplate.  Washi tape across the top and bottom; the rhinestone flourishes and self-adhesive trim.  To complete the graphics for my nameplate and for the frame, I went to the free online SignCreatorat deflecto.com/signcreator.  This makes it easy and fun.
I put a removeable cover on the four drawer cube that is made out of cardstock and held together with washi tape.  I further embellished it with self-adhesive faux rhinestone trim. (I got it at Michaels one of the dollar bins).
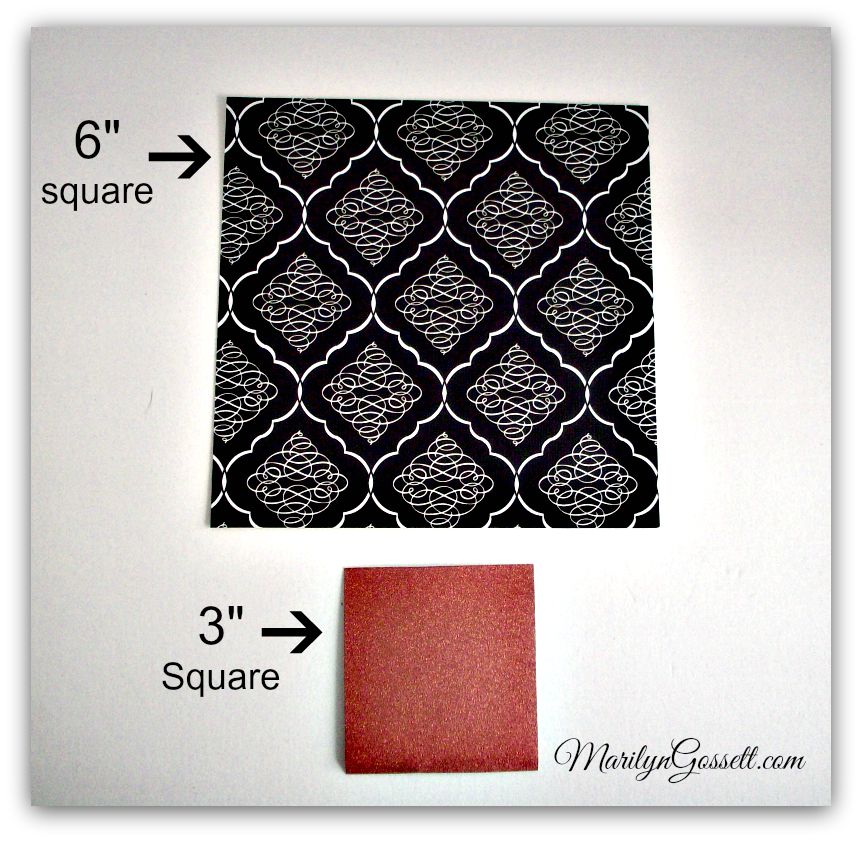
Cut four 6" squares from one 12" piece of patterned cardstock.  Make sure the pattern on the paper is going in the right direction, matching up the pattern as well as possible.  Refer to photos below to see how they are put together.

Place the assembled cardstock cover over the cube.  Apply washi tape on the back side seams to secure. Decorate with the faux rhinestone self-adhesive trim.  Here is how it looks after you attach the papers to the cube.  You can change it up if you want to!


Hope you got a little inspiration here today. 

.


Make sure to take time to enjoy the small blessings along the way; and
Life Life with a Flourish!

Marilyn


Wednesday, June 22, 2016

Our DIY Wedding, a "Tied the Knot" Banner!

 We are looking forward to our daughter's wedding this Summer.  I have the perfect embroidered letters for the banner sentiment!  Follow along and I will show you how I made it!


You will need:

sign/banner hangers:  1 for each rosette  (Deflecto #20003CR)
JOY Letters:  3" tall alphabet letters to spell:  TIED THE KNOT
cardstock:  fifteen 12" x 12" sheets of teal & black double-sided (core'dinations)
ribbon:  2-1/2" gold wire edged; 1-1/2" sheer vintage white (3 yards of each)
paper trimmer
paper scorer
die-cut machine
die for scalloped circle
punch or die-cut for 2" circle, 1" circle
glue gun
jute string
scissors


Instructions:

1.  Score one 12" piece of cardstock at 1/2" intervals.  Score across the entire sheet.

2.  With the score marks going up and down; cut out four 3" x 12" rectangles from the paper.

3.  Fold the score lines back and forth like for a fan.  Repeat for all 4 pieces.

4.  Match the ends and glue together with the same color facing up.


5.  For each rosette:  When all sides are glued together/ lay the rosette flat and push it together until there is about a 1" hole in the center.  It can be tricky trying to hold it all together, but you can do it!  Apply hot glue around the opening.  Adhere one 2" circle to cover the hole.  Repeat on the opposite side.  Make sure everything is centered properly.  Make enough rosettes for each letter of your sentiment.  This design took 11 rosettes.

6.  For this banner; the colored rosettes are staggered; one teal next to one black, then repeated.
Reverse the 4" scallop circles and adhere black to teal, then glue the teal to a black rosette.  Refer to the photo given for this step.

7.  Lay the rosettes flat, rotating the colors; one next to the other.  Remove the adhesive from the back of one 3" Joy letter and adhere it to the 4" scalloped circle on the first rosette.  Be sure to spell everything correctly!  Repeat for each letter.


8.  To hang the banner:  Lay one rosette with the letter facing up if you are reading it.  Flip the rosette over and adhere a 1" circle of cardstock where the hanger will go.  Make sure it is centered with the middle of the letter on the opposite side and will hang straight when you thread it onto the jute.  Apply the adhesive to the back of one hanger and adhere the hanger to the 1" circle as shown.  Make sure the hole in the hanger is in the right position....going the right direction.  Repeat for each rosette.


9.  Once step 8 is accomplished; measure the jute string for the length you will need and double.  Thread two strands of the 3-ply jute string through the eye of each hanger.  **Designer note:  If you do not have the hangers.....space your rosettes evenly; right side facing up and glue the string between the rosette and another cardstock circle on the back.  It will be important to make sure everything is hanging at the appropriate angle for all of the letters to be straight.

10.  Tie a loop in each end of the jute so you can hang the banner.

11.  To finish:  Cut the ribbons in 8" lengths.  Tie 4 ribbons between each word and at each end of the banner.  Now it is ready to decorate your party!

**Designer note:  You can reduce the size of your rosettes by cutting them in 2" strips instead of 3" strips.  You can also use 3 strips of the scored cardstock for each rosette.  This will make the rosette a little lighter in weight.


Thank you for stopping by!  I love getting comments and questions.

Make sure to take the time to enjoy the small blessings along the way and;

Live Life with a Flourish!

Marilyn


Friday, June 17, 2016

Build a Treat Station with Deflecto Stackable Storage!

Storage is fun for the obvious things, right?  I decided to up the fun factor by putting together this DIY Candy, Gum and Nut treat station.  This is perfect for any party, get together, or as home decor.  It will be perfect in my design studio to provide treats for my guests.  We always get hungry when we are creating!


You will need: 

Acetate scrapbook paper:  I used four different designs of 8-1/2" x 11" papers
Americana Acrylic Paint by DecoArt:  Sea Aqua (to match the papers)
Wooden Ball knobs:  two 1-1/4"
Mod Podge:  Dimensional Magic by Plaid (for gluing)
Glitter cardstock:  12" x 12" gold
Die cutting machine (Cricut) to cut letters
Paper trimmer
Ruler
Paintbrush, two 1/4" dowels (for paint handles)
Adhesive tape runnerYou will need:

*deflecto:  interlocking stackable storage (4 bins in unit #421103CR)

Here is the finished project!  Next, I will tell you how I did it.
1.  For each drawer:  Use the ruler to measure the height and width of the front of one bin drawer.  Cut the acetate to fit; apply small dots of adhesive to the right side of the acetate, top and bottom.  Adhere to the inside of the bin drawer.  Cut a contrasting paper to fit the inside of the back of the drawer.  I used an acetate with a cursive design on it.  This is just to add a little dimension.  Repeat for all four drawers.  Cut extra pieces of acetate to further decorate the top and sides of the unit if desired.

2.  Die cut the letters from the glitter cardstock.  My largest letters are 1-1/2"  The smallest are 3/4".  Make sure all of the cut letters fit on the bin drawer before you glue them down.  You will adhere them directly to the acrylic bin drawer as shown.  Use the Mod Podge dimensional magic as the adhesive for adhering the letters.  Apply small dots of adhesive to the acetate paper to adhere each piece to the acrylic.
3.  This is what the wooden knobs look like before you paint them.  Make sure you like the way they look on your treat station.  Some may prefer to leave it plain.


4.  Insert one end of the wooden dowel (or chopstick) into the pre-drilled hole of the ball knob.  Paint each knob and let dry thoroughly.

5.  Adhere the knobs to the top of the treat unit as shown using a dab of the dimensional magic adhesive for each.


There you have it!  You can attach your bins to each other as shown in the photo above, or keep them separate to place around your event or home.  How you decorate your storage bins is up to you.  The possibilities are endless!

Visit deflecto crafts Solutions at http://www.deflecto.com/craft/  for ordering information.

I hope you got some inspiration here today.  I love getting comments and questions.  You can leave one below!

Make sure to enjoy the little blessings along the way and,
Live Life with a Flourish!

Marilyn


Thursday, May 19, 2016

Deflecto for DIY Wedding Table Markers

wedding table markers marilyn gossett

We have a wedding coming this summer! I get to be the DIY wedding decorator and I am so excited. My daughter has chosen her colors and now I get to put my hand to the task of creating table decorations and more! We have lots to do and this is just the beginning...you'll see more of my wedding projects in some other blog posts.....

For the table markers I put together the following supplies:


Deflecto: 3" x 4" mini sign holders 

Joy embroidered numbers
Cardstock -  teal, black, black/ivory stripes, gold glitter, turquoise glitter
Rhinestone trim
Pearl embellishments
Adhesives, scissors, paper trimmer, glue gun


Instructions:

To make one of the flowers, cut the teal cardstock (12"x12") into nine equal squares. Cut off the four corners of one square making it round - it doesn't have to be perfect. Cut it into a spiral shape, about 3/8" thick. Leave a little circle in the middle. Roll the spiral into the form of a rose. Adhere the circle on the bottom to the rest of the flower to secure. A glue gun works best for this step, especially if you have multiple flowers to secure.  I use my fingers and thumbnail to distress the edges of the rose.  Repeat for each flower. Cut smaller squares of cardstock for smaller roses.

Cut out leaves by hand or with a die-cutting machine. If you cut out a heart and cut it in two; you can more easily shape each half into a leaf. Add the leaves after gluing the flowers to the frame.

To frame each table number, cut mattes from the cardstock as follows:

Stripe/teal:  3" x 4"
Gold:  2" x 2-1/2"
Black:  2-1/8" x 2-3/8"

Center and adhere the gold paper to the slightly larger black paper.  Center and adhere to the background paper 1/2" up from the bottom edge. Insert into the frame.

Embellish the outside of the frame with the faux rhinestone trim, flowers and leaves. Glue one pearl into the center of each rose.

Remove the backing from each number; center and adhere to each frame as shown in the photo given.

Thanks for taking time to stop by today.  I hope you got some inspiration for your next event.

Make sure to take time to enjoy the small blessings along the way and,

Live Life with a Flourish!

Marilyn

To make a matching wedding sign for the Mr. & Mrs. click here!  http://marilyngossettdesigns.blogspot.com/2016/05/deflecto-for-diy-wedding-table-markers.html

A "perfect-o" Deflecto DIY wedding!


joy embroidered letters wedding table marker


Weddings are a joyous occasion! We have a wedding coming up this summer and I am busy helping with DIY projects to decorate the venue.

Last month I blogged about the table markers that I created with the Joy embroidered letters. I have completed the table marker project with this beauty that will sit at the head table with the bride and groom.

To create this sign you will need the following:

  • Joy embroidered letters, spelling Mr. and Mrs. with the last name
  • 12" acrylic sign holder (by Deflecto)
  • Cardstock - black/white stripe, plus solid black, teal, green
  • Gold glitter cardstock
  • Pearl beads, star embellishment
  • Paper trimmer, scissors, adhesive
  • Self-adhesive faux rhinestone trim
  • Die-cutting machine with die-cut for scalloped ovals
  • Paper flowers

Instructions:

To make hand-rolled paper flowers, cut cardstock into various sized circles 2" - 4" in diameter - they don't have to be perfect. Cut each circle into a 3/8" spiral. Leave a little circle in the middle. Roll the spiral into the form of a rose. Use a hot glue gun to secure the rolled spiral at the bottom. I use my fingers and thumbnail to distress the edges of the rose.


Cut out leaves by hand or with a die-cutting machine. If you cut out a heart from a folded sheet, then cut the heart in half along the fold, you can more easily shape each half into a leaf.

Cut the striped cardstock to fit the size of the acrylic sign holder, then trim black and teal sheets to fit behind the couple's last name. Layer and adhere these background papers together and slide into the sign holder.

Die-cut a pair of scalloped ovals from cardstock (larger black and smaller gold glitter) for each letter. Glue to the outside of the sign holder, then center and adhere each letter on top as shown. Embellish your table marker with the flowers, leaves and rhinestone trim. Glue a pearl into the center of each flower.

Spell your name in Joy letters, available at your local craft store!

Thank you for stopping by, I hope you got some inspiration here today!  Make sure to take time to enjoy the small blessings along the way and,

Live Life with a Flourish!

Marilyn


Deflecto Cube Storage for Parties and Events

WELCOME SPRING!  There is a reason to celebrate almost every month of the year and Deflecto has just the products for you to put on a successful event!  The cube storage that I am featuring on my blog today can be used for craft storage or for the party/event table!  I am showing some ideas for the party table.  There so many looks you can achieve.


Stackable Cube Organizer - "X" Divider pictured above.


For the bin pictured above you will need the following supplies:

Deflecto:  x cube storage; Sign Tag with wet erase white chalk pen
washi tape to match your project
jute string
button embellishments
adhesives
stamped sentiment (optional)
12" x 12" cardstock sheet (your choice of colors and print)


4-drawer stackable cube organizer pictured above.


Sign Tag with wet erase chalkpen/marker


What do I need to decorate the cubes for a party or event?  

For each cube you will need to cut a 12 x 12" cardstock sheet into four 6" squares.  Trim any excess and fit around all sides except for the bottom.

Adhere the squares together at the seams using Washi tape.

Embellish the outside of each drawer.  I layered scalloped circles and glued a button on to finish.

Inside of drawers.  cut a strip of paper to fit the bottom of one drawer.  Insert.  Repeat for the remaining drawers.

Fill the drawers with candy or other little goodies.  Bubblegum balls in theme colors look cute in the drawers.

I hope you got some inspiration from the blog post today.  Check out all of our design team posts!


Make sure to take the time to enjoy the small blessings along the way and;

Live Life with a Flourish!

Marilyn


Disclaimer:  I have rec'd free product for
this blog post.