Showing posts with label #Cre8time. Show all posts

Tuesday, August 23, 2016

"YOU ARE MY SUPER HERO" Refrigerator Magnet


I have a Super Hero!  My husband!  I think he needs to be reminded once in a while.  Do you have someone you would like to honor?  Here is a project you might enjoy.


You will need:

Joy(R) embroidered letters:  3/4", 1", 1-1/2", 1" star.  Here's the link: http://joysa.com/letters.html
deflecto magnetic sheets:  #5901
acrylic paints:  Blue and Yellow
paintbrushes
scissors
electronic die-cut machine (set on high pressure with deep cut blade)
die of choice
water bucket
paper towels and paper plate


Instructions:

1.  Adhere the magnetic sheet to die-cutter mat.  Set the dial to maximum pressure and preferably use a deep cut blade.  After cutting, fold the sheet on the cut line until it breaks open.  Then, carefully punch out the shape.

2.  Paint the first layer blue.  You don't need to paint the entire surface; just the border.

3.  Paint the top layer yellow.  Allow both to dry thoroughly.

4.  Adhere the top layer to the bottom layer.  You won't need a lot of adhesive.  Just enough to keep them from falling apart as the magnetic surfaces will stay together when applied to metal surface.


5.  Position the letters on the yellow layer.  I used a long tweezers to help pick up and place the letters.
Remove the release paper on the larger letters.  Use a strong holding tacky glue for the smaller letters.

6.  Once you apply all of the embroidered letters, the magnetic plaque is ready to hang on the refrigerator!
Let's celebrate the Super Hero's in our lives!

Monday, August 15, 2016

Monogrammed Mirror and Jar Decor with etchall(R)

Gather a recycled jar with lid; a soda bottle with the top cut off and dip'n'etch liquid.  You will need a beveled edge mirror and a 4" square mirror for the center.  I purchased a wooden painted easel and painted over it with a color that I chose for my theme.
You will need:

etchall (R):  dip n' etch liquid; etchall creme, squeegee; etchall(R); etchmask Stencil ComboPak
die cutting machine 
Multi-Surface FolkArt piant by Plaid(R)
Tacky Glue
Embellishments:
Cording; 1 yard gold
Flowers; 1" pink mulberry paper
Corners:  gold filigree, 2
Pearls:  singles cut from pearlstring strand
scissors
paintbrush
water bucket
paper towels

Instructions:

1.  Follow the instructions given and attach the etchall transfer sheets to the etchall etchmask.  Cut the strips the size you want for applying stripes to the jar.  I cut them 1/2" x 4".  Cut enough to fit around the jar.

2.  Remove the release paper and apply evenly to the jar.  Use the squeegee to remove all and any air bubbles; then remove the transfer paper from the top of the etchmask.  

3.  Pour water into the soda bottle and insert the prepared jar.  Remove the jar and mark where the water line should be to prevent over-pouring.  Fill the soda bottle up to the marked line with etchall (R) dip 'n etch.
Fill the jar with water for added weight and place inside the soda bottle.  The etching liquid should come up to the top of the jar.  Set the timer for at least 15 minutes.  

4.  Remove the jar from the soda bottle.  Take care to pour the dip 'n etch back into the original bottle.  You can use it again!  Pour the water from the jar and rinse and dry it thoroughly.  Set it aside for now.


5.  Paint the lid with the Multi-Surface paint.  Allow to dry.  While the paint is out; paint the easel to match if you would like to change the color.

6.  For the beveled mirror:  Set the 4: square mirror in the center of the top of the larger mirror.  Use a pen or pencil to trace around the mirror.  Cut the strips to fit from the outer edges of the mirror into the marked line.  Remove the release paper from one strip of etchmask and attach it to the mirror.  Repeat with the remaining strips; spacing them evenly as shown.  Cut four 3/4" squares from the etchmask and adhere one to each corner of the mirror.  Use the squeegee to remove air bubbles; then remove the transfer paper from the etchmask.

7.  Lay the mirror on a flat surface and apply the etchall creme as directed by the manufacturer.  Set the timer for at least 15 minutes.  When time is up; place the creme back into the original container.  Rinse and dry the mirror thoroughly.  There is a great training video on the website if you have not etched before.  Here is the link:  http://etchall.com/getting-started/

8.  Die-cut the monogram and apply to the smaller mirror.  Repeat the process with the etching creme.  Remove the etchmask; rinse and dry the mirror.


9.  Use X-treme hold adhesive tabs to attach the monogrammed mirror to the center of the larger mirror. I used Tombow brand.


10:  To finish:  Adhere the cording one side at a time using the tacky glue.  Adhere cording around the neck and to the top of the jar.  I decorated the lid further with a 3" round mirror and glued the cording around the mirror.  Adhere the filigree corners to the bottom of the mirror and the flowers to the upper left hand corner.
You can make this your own by embellishing with your colors of choice.  I love finding recycled glass items to etch.  The thrift stores are a great place to start; but the craft store has much to offer as well!


On a personal note:  I will be taking these up to my mother's memorial service this next week-end.  She suffered for years with a mind robbing disease called Alzheimer's.  We are asking family and friends to donate toward the Alzheimer's foundation in lieu of flowers and the jar will be for people who donate at the site.  I will miss my mother; but we know she is in a much better place and free from a world that she no longer recognized.  

I hope you got some inspiration here today.....and I like getting comments if you would like to leave one.  Maybe you have a question.

Make sure to take time to enjoy the small blessings along the way and;

Live Life with a Flourish!

Marilyn


I receive a small stipend & free
product in exchange for sharing 
my creativity.


Thursday, June 23, 2016

Decorate the Office with Deflecto!


Have you heard of Deflecto?  There is a good chance that you haven't heard the name, but there is also a good chance that you have used the products they manufacture! 

The frame, four drawer cube and nameplate are shown below.  The frame is acrylic with a black border, the storage cube is clear, and the nameplate comes in silver and black.  I have customized each one to fit with my design studio and I show how I did it below.


Nameplate is decorated with washi tape, rhinestone flourish, paper flower and pearl cabachon.
The faux rhinestone trim comes on a roll and has a self-adhesive back.
The frame is decorated with the same supplies as the nameplate.  Washi tape across the top and bottom; the rhinestone flourishes and self-adhesive trim.  To complete the graphics for my nameplate and for the frame, I went to the free online SignCreatorat deflecto.com/signcreator.  This makes it easy and fun.
I put a removeable cover on the four drawer cube that is made out of cardstock and held together with washi tape.  I further embellished it with self-adhesive faux rhinestone trim. (I got it at Michaels one of the dollar bins).
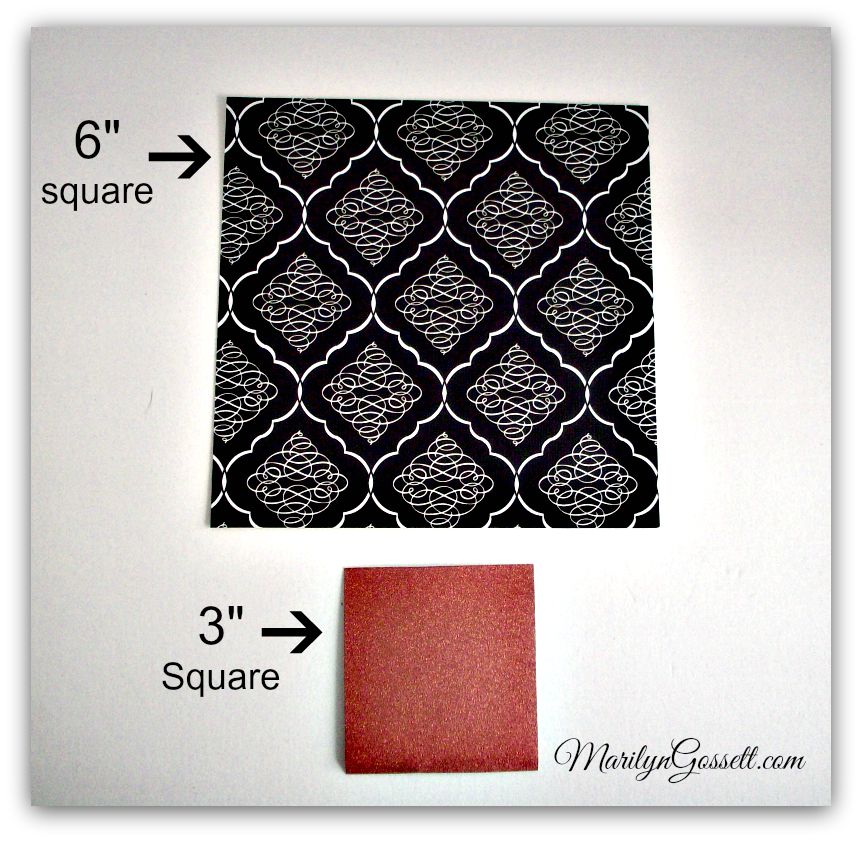
Cut four 6" squares from one 12" piece of patterned cardstock.  Make sure the pattern on the paper is going in the right direction, matching up the pattern as well as possible.  Refer to photos below to see how they are put together.

Place the assembled cardstock cover over the cube.  Apply washi tape on the back side seams to secure. Decorate with the faux rhinestone self-adhesive trim.  Here is how it looks after you attach the papers to the cube.  You can change it up if you want to!


Hope you got a little inspiration here today. 

.


Make sure to take time to enjoy the small blessings along the way; and
Life Life with a Flourish!

Marilyn


Monday, June 6, 2016

Perpetual Calendar; Steampunk style!


You will need:

Smoothfoam: one 12" Scrapbook Mount
12" Scrapbook Tablet: Tim Holtz, "Destination" paper stash
12" cardstock:  one Slate, one Dark Brown
Decou-Page medium: Matt by Deco Art
Metallic Waxes:  Black and Copper by Deco Art; rag scraps for application
Craft Glue
Pigment Ink Pad, Black
Embellishments: 1-1/4" filigree butterflies, 1-1/2" filigree squares, 1" metal washers, brass paper fasteners,
                          1" h x 3" w doll eyeglasses, paper roses: 3/4", 1-1/4"
Tissue Paper:  matte gold, metallic gold
19 gauge wire, two pieces bent into 1/2" u -pins
2 tacks with a hook: used patented clear and round CraZy TACKz  (see link in credits below)
Artiste Cricut Cartridge by Close To My Heart (die-cut gears)  (see link in credits below)
PDF's:  (attached) Calendar Elements, Pattern for Wings, Gears

Tools: 
Cricut Die-cut machine
Paper Trimmers
Scissors
Paintbrush
Wire Cutters


1.  Wad the tissue into a ball.  Unfold and flatten out.  Apply Decoupage medium to the Smoothfoam,                 following manufacturer's instructions.  Tear tissue into large pieces; adhere to the entire surface.  Tear             large strips of the metallic gold tissue.  Adhere, leaving wrinkles in the tissue paper.  Allow to dry                   thoroughly, preferably overnight.

2.  Apply copper wax randomly to the textured surface, allowing the gold to show through in spots.  Repeat      with the black shimmer wax.  Apply the Shimmer Wax to the paper wings and to the filigree elements.


3.  Cut ephemera clocks from the Tim Holz papers.  The cardstock gears were die-cut.  A PDF file is                attached if these must be cut out by hand.  The larger gears are important for the over-all design.  The 1-      1/2" die-cut gears could probably be replaced by something purchased that will work the same.  There          are 22+ of the smaller gears that are adhered to the perpetual calendar pages.

4.  Chalk the edges of the ephemera and die-cuts with the Black pigment ink pad.

5.  Arrange and adhere ephemera to the textured Smoothfoam.

For the Calendar:

1.  Background:  Cut one 6-1/2" square and one 6" square from patterned cardstock.  Adhere the smaller          square to the larger square.  Center and adhere to the board.

2.  Months:  Cut twelve 1" x 2" rectangles.  Print out the attached PDF containing the months and dates.            Center and adhere "January" to the background paper.  Repeat with February and adhere to the                    backside of the January card.  Repeat for each month.

3.  Days:  Cut 22 2-1/2" x 3" rectangles.  Cut and adhere the days as for the Months, using the front and the      back of each card.

4.  To hang the cards:  Center and glue the bottom half of a 1-1/2" gear to the front of the January card.              Repeat; gluing one gear to the front of each card.

 To finish:
*  Cut the fasteners off of the brass paper fasteners and glue the round piece to the corners of the                     calendar as shown.  Repeat the process with two more brads only adhere one to the center of the 2 large     gears.
*  Center and glue the CraZy TACKz to the calendar.  Hang the perpetual calendar cards on the hooks.
*  Center the eyeglasses above the calendar cards.  Make 2 pilot holes for the wire u-pins.  Secure the             eyeglasses to the board.
*  Display on an easel or glue a saw-tooth hanger to the back.


You can add a couple more panels to the calendar for a larger piece of wall decor.  These last two photographs show an example of some Steampunk paper sculptured angels I made last year.  I make them in ornament size (6") as well as the taller ones as shown here.  Hope you have enjoyed the project!

Visit the Smoothfoam Blog (link) for lots more ideas using Smoothfoam products.

Live Life with a Flourish!

Marilyn

PDF Patterns for gears and wings (link)


My Etsy Shop:  https://www.etsy.com/shop/PrimarilynlyPaper

Tuesday, May 24, 2016

SmoothfoamR "no measuring" Wreath Base

SmoothfoamR has a new wreath form that takes away the need to measure!  It is perfect for changing up the colors when you want to space them evenly.


Do you like Alice in Wonderland?  We do!  We are doing a DIY wedding in August.  This wreath will be on the door in June just in time for the bridal shower!  The theme is a Mad Hatter's Tea Party!  We have all kinds of fun plans for decorating and this is the first piece. The wedding colors are black and white stripe, teal and pale shimmer gold with a touch of pink.  It is fun incorporating the wedding colors into the bridal shower.  

I will show you the process starting with the Smoothfoam wreath forms.  I chose the smaller size for my wreath.


Cut the ribbon and use the measured indentations on the wreath to space it properly.  The glue gun works best for a quick adhesion to the wreath.


I wrapped the narrower ribbon around the wreath several times to fill in the space; gluing it on the wrong side.


I added a lot of texture to this wreath as you will see in the following pictures.  I pinched the wire edged ribbon at intervals of about 4" and hot glued the pinched portion to the wreath.


I purchased several rolls of black and white ribbon using mainly the black and white stripe.  I made shoestring bows from the ribbons, trimming the tails in a V.  The ribbons were hot glued to the wreath in intervals.  I followed up with the flower blossoms and some leaves; then adhered pom-poms to the tails of the ribbons as shown.  This process was not that exacting; but I did use my background as a guide.


My final touches were adding a Mad Hatter's hat and the Cheshire Cat's face to the wreath.  

For the cat's face:  I pinned an 8-1/2" x 11" piece of pink shimmer paper to the back of the wreath so it would show through the center.  The eyes are paper punch layers with an iris cut from the black paper.  I adhered the layers together, centered and glued to the pink paper as shown.  I drew the mouth with a black permanent marker, cut it out and adhered it to the pink paper as shown.  The nose is a piece of black cardstock that I cut out and glued to the face.


I hope you got some inspiration here today and will try out the new Smoothfoam wreath forms.  They are the perfect solution to a quick and easy application of embellishments.

We are looking forward to all the festivities and still have lots of DIY to finish up!

Make sure to take time to enjoy the small blessings along the way and,

Live Life with a Flourish!

Marilyn


Look for the new wreaths on their website!  http://www.smoothfoam.com/


Thursday, May 19, 2016

Deflecto for DIY Wedding Table Markers

wedding table markers marilyn gossett

We have a wedding coming this summer! I get to be the DIY wedding decorator and I am so excited. My daughter has chosen her colors and now I get to put my hand to the task of creating table decorations and more! We have lots to do and this is just the beginning...you'll see more of my wedding projects in some other blog posts.....

For the table markers I put together the following supplies:


Deflecto: 3" x 4" mini sign holders 

Joy embroidered numbers
Cardstock -  teal, black, black/ivory stripes, gold glitter, turquoise glitter
Rhinestone trim
Pearl embellishments
Adhesives, scissors, paper trimmer, glue gun


Instructions:

To make one of the flowers, cut the teal cardstock (12"x12") into nine equal squares. Cut off the four corners of one square making it round - it doesn't have to be perfect. Cut it into a spiral shape, about 3/8" thick. Leave a little circle in the middle. Roll the spiral into the form of a rose. Adhere the circle on the bottom to the rest of the flower to secure. A glue gun works best for this step, especially if you have multiple flowers to secure.  I use my fingers and thumbnail to distress the edges of the rose.  Repeat for each flower. Cut smaller squares of cardstock for smaller roses.

Cut out leaves by hand or with a die-cutting machine. If you cut out a heart and cut it in two; you can more easily shape each half into a leaf. Add the leaves after gluing the flowers to the frame.

To frame each table number, cut mattes from the cardstock as follows:

Stripe/teal:  3" x 4"
Gold:  2" x 2-1/2"
Black:  2-1/8" x 2-3/8"

Center and adhere the gold paper to the slightly larger black paper.  Center and adhere to the background paper 1/2" up from the bottom edge. Insert into the frame.

Embellish the outside of the frame with the faux rhinestone trim, flowers and leaves. Glue one pearl into the center of each rose.

Remove the backing from each number; center and adhere to each frame as shown in the photo given.

Thanks for taking time to stop by today.  I hope you got some inspiration for your next event.

Make sure to take time to enjoy the small blessings along the way and,

Live Life with a Flourish!

Marilyn

To make a matching wedding sign for the Mr. & Mrs. click here!  http://marilyngossettdesigns.blogspot.com/2016/05/deflecto-for-diy-wedding-table-markers.html

Wednesday, May 11, 2016

Candy Bins for a Wedding Celebration!

What is a wedding without sweets, right?  I have a great idea for using a deflecto craft storage bin to serve up treats for the wedding guests.


The "star" of this project will be the 5 bin unit by Deflecto. I used 3" black collegiate letters.  They have an adhesive on the back side that is meant to be temporary; as the real adhesive is heat activated.  In this case; I removed the release paper from each letter and applied one to each bin to spell "CANDY".  You should be able to remove them after the wedding and use the bins for craft storage.

You will need:

Deflecto:  Craft Tilt Bin by ; a 5 bin unit
Joy:  3" black embroidered letters to spell CANDY
Black spray paint for use on acrylic plastic (or color of your choice)
Trim:  single strand faux rhinestone self-adhesive
Scissors
painters tape
clear packing tape or newspaper

Instructions:
  • Remove the bins from the unit.  Line them up on a flat surface.  Remove the release paper from one letter, center and apply to the bin.  Leave it loose until all of the letters are lined up evenly.  Repeat for each letter.


Close-up View below
 
  • Tape off all areas you do not want to apply paint to.  You may choose to leave the bin unit white.  That is perfectly OK!
  • Cover up any small holes with painters tape on the inside edges of the unit.
  • I applied clear packing tape across the front to protect the inside of the unit.  Then, applied painters tape around the front edges.
  • In a well ventilated area; follow the manufacturer's instructions and paint the entire unit with the exception of the inside.  Allow to dry thoroughly.  Remove the tape.  Reinsert the bins.


  • Each bin will have a slot and paper to identify what is inside.  Embellish the edges with the faux rhinestone trim.
If you would like to know how I made the mini faux cakes on top of the candy bin; check out the blog post link here:  http://marilyngossettdesigns.blogspot.com/2016/04/mini-wedding-dessert-with-smoothfoam.html

Thank you for checking out the blog today.  Hope you got some inspiration for your next celebration.  I am going to do "BABY" with a four bin unit next!

Take time to enjoy the small blessings along the way and
Live Life with a Flourish!

Marilyn


Look for deflecto Crafts  products on Amazon.
Check this link for more deflecto products:  http://www.deflecto.com/craft/


Friday, April 22, 2016

Mini Wedding Cake for "Looks" Only!


Hello Friends!  We are nearing wedding season.  I have been looking on Pinterest at wedding cakes.  We have a wedding coming up this Summer and I have turned my attentions to wedding decorations, cakes, flowers, clothing, etc.  

I needed some mini desserts for some of the decorating I am creating.  I decided to use Smoothfoam and my hot foam cutter to create some of my own.  I will show you how I did it if you follow along!

You will need:

Smoothfoam:  3" block (for cake)
light modeling paste (gel medium)
acrylic paint:  light teal
paintbrush
craft stick or plastic knife
disposable plastic container
wooden skewers
paper flowers:  pink roses:  1", 1/4", 3/4" leaves
1/2" leaf punch
cardstock scraps:  green
faux rhinestone trim with adhesive back
hot foam cutter
glue gun
scissors
water
paper towels

Instructions:

1.  Mark off 1" intervals on the 3" Smoothfoam block using a pencil and ruler.  Cut into three 1" thick x 3" pieces.  Leave the bottom layer 3" x 3".  Cut the middle piece into a 2-1/2" square; the top piece into a 2" square.

2. Mix two drops of paint into a quarter cup of modeling paste.  Stir the color into the paste using a craft stick.  Blend thoroughly.

3.  Use a wooden skewer as a handle by poking the pointed end into one block of foam.  Repeat with the other two pieces.  Have a container handy that you can stand the skewer in until the modeling paste dries.  Coat each piece with the modeling paste.  Stand skewer handle in a container and let the modeling paste dry thoroughly.

4.  Adhere the layers using small pieces of toothpick as connectors.  The glue gun is recommended for this step. 
3.  Use a wooden skewer as a handle by poking the pointed end into one block of foam.  Repeat with the other two pieces.  Have a container handy that you can stand the skewer in until the modeling paste dries.  Coat each piece with the modeling paste.  Stand skewer handle in a container and let the modeling paste dry thoroughly.

4.  Adhere the layers using small pieces of toothpick as connectors.  The glue gun is recommended for this step. 

5.  Decorate the "cake" with the paper flowers, adhesive trim and leaves.  *Designer note: For the final touches on the cake; you can add your own touches.  Pearlstring, ribbon, jewels, and glitter are just a few of the embellishments you might want to use on your mini cake. 


Check out some other variations using Smoothfoam as the base for the cake.  I will be adding these to another project I am working on.  Stay tuned!


Hope you have enjoyed this tutorial.

Make sure to take time to appreciate the small blessings along the way and,

Live Life with a Flourish!

Marilyn