Showing posts with label etchall squeegee. Show all posts

Thursday, November 30, 2017

DIY Snow Globe with etchall(R)


Have you ever tried etching?  I have a project idea to share with you today.  I used a recycled jar, some craft mirrors, glue and glitter and created a DIY snow globe.  I used some small sisal trees but you can use any miniatures that you would like to put in your snow globe.  Read on to see how!

******Follow this link to watch a video of Barbee explaining how to use etchall(R)

Materials you will need:

etchall(R): 16 oz.  dip'n etch
etchall (R):etchmask
etchall (R) squeegee
tacky glue
white glitter
sisal trees (any other minis you want for your globe)
3" foam ball - halved
craft mirrors:  1/2" square, 2-1/2" round
trim:  1/2" silver
recycled plastic bottle or container with the top cut off.  (slightly larger than the jar)
scrap paper
scissors
adhesive vinyl:  red
die-cut machine:  cut the word "Believe"
marbles or rocks (for weighting the jar)


Directions:

1.  Make sure your recycled jar is clean and sparkling! Don't forget the lid!
2.  Use the die-cut machine to cut a 3" wide oval.  
3.  Adhere the oval to the jar.  Use the Squeegee(R) to smooth out any air bubbles.  Remove the transfer paper and discard.
Now you are ready to etch!
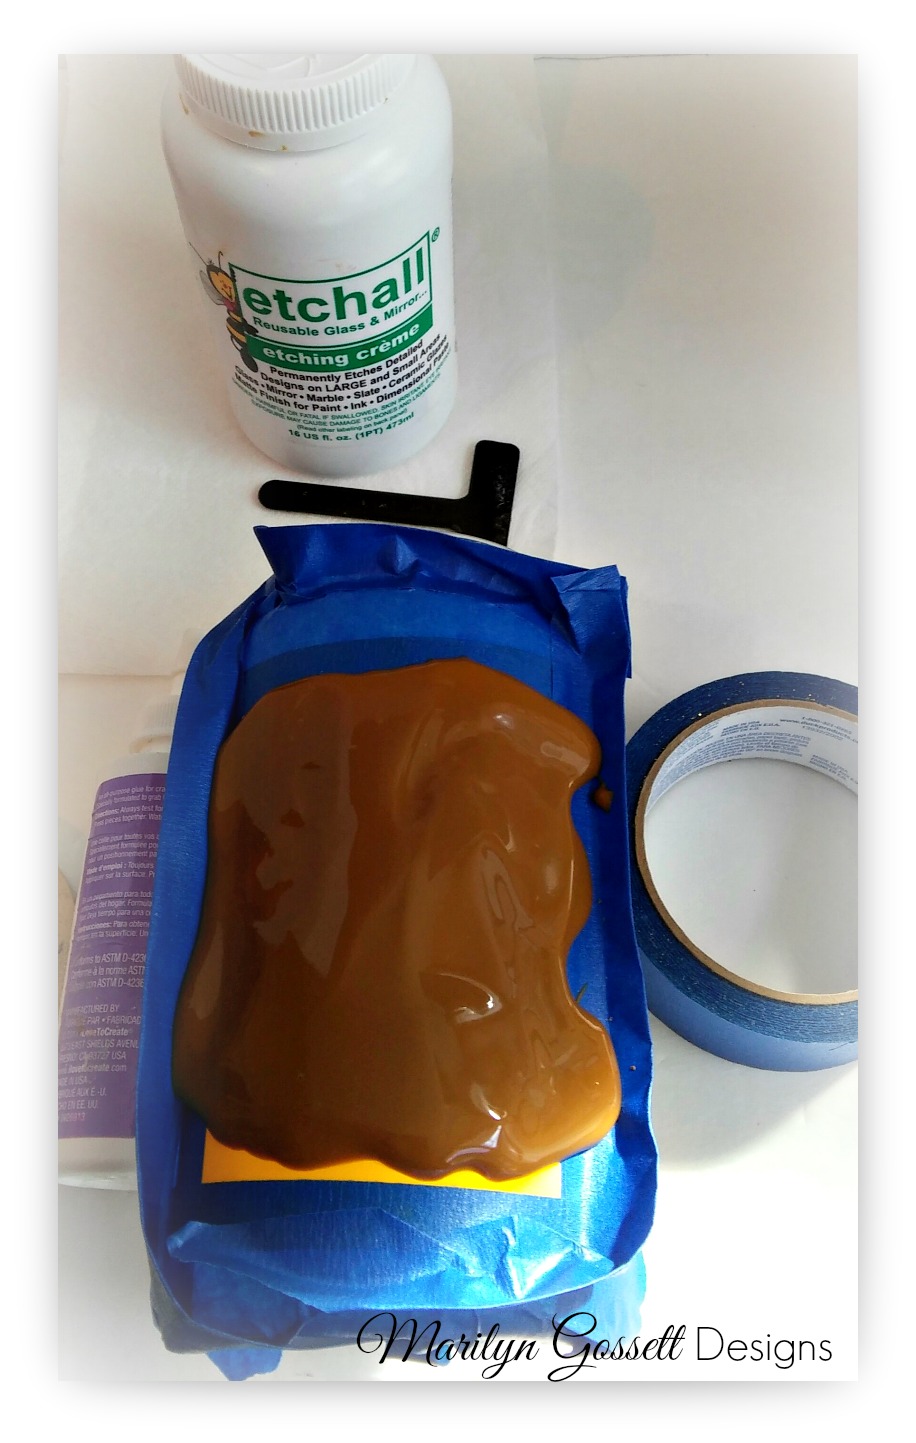
4.  Add some marbles or rocks to the jar to give it some weight.  Sit it in the recycled plastic container.  Carefully pour the etchall(R) dip'n etch into the container.  As you can see in the photo below, the liquid is very dark.  That is a natural process with this product that happens over time.  The product is still good!  Go ahead and use it and make sure to save it for another use after you have your etch!
5.  Set the timer for 15 minutes.  If you need to adjust the jar in the etching liquid you can leave it in longer.  When the time is up, remove the jar, remove the etchmask (discard), and wash thoroughly.  Return the dip'n etch liquid to it's original container for another use.
6.  Now comes the fun part!  Invert the jar and adhere a round craft mirror to the (now) top of the jar.  Adhere the smaller square mirrors around the sides as shown.  I used a jar that had little square indents around the top and bottom which worked great for placing the mirrors.  You could use large rhinestones for this step too.  Apply a line of glue around the un-etched oval on the jar.  Cover it with glitter.  Also apply glitter around the mirrors.  Careful not to get it too messy or your mirrors will slide off.
7.  Trim the foam to fit the inside of the lid allowing room for the jar to screw back on.  Adhere the foam to the lid.  Adhere the trees to the foam and sprinkle heavily with glitter.  Allow to dry.
8.  I used my die-cut machine to cut out "Believe" from a red vinyl adhesive sheet.  I used some transfer paper over the top of it and applied it to the jar as shown.  Once all the air bubbles are rubbed out; remove the transfer paper.

9.  Insert the trees into the jar; screw the lid in place.  Finish by adding some silver trim around the sides of the jar lid.  

10.  I showed a variation at the top of the page.  Let your imagination be your guide!  Using recycled jars of all sizes make great snow globes for decorations and gifts.

Make sure to take the time to enjoy the small blessings along the way and

Live Life with a Flourish!
Merry Christmas!

Marilyn


I received complimentary product for this
blog in exchange for my creativity,


Monday, March 13, 2017

Celebrate Spring with Etchall(R)!


Etchall(R); a little paint and some embellishments will take an inexpensive glass container to new heights!  I will show you how I transformed an apothecary jar and a glass bottle into gifts I would give or keep as home decor.


Materials:


Etchall(R):  etching creme; dip 'n etch liquid; "Love you a Latte" stencil; Detail Pick Tool;  Squeegee
Glass:  apothecary jar; heart shaped bottle with cork lid

Paint:  Multi-surface acrylic - Teal

Sponge
Ribbon
bunch of silk flowers
mulberry or paper flowers
scissors
painters tape or masking tape
plastic container for dipping

Adhesives

Instructions:

** Before you start:  You will be re-using the etchall(R) creme and liquid.  Do not throw it away!  It is good for many uses even if it starts turning brown as it has in the photos shown here.  I will use it for as long as it keeps etching.

1.  Dipping in etchall:  Cut the top off of a disposable plastic container.  The smaller size; the better.  It has to be large enough for the piece to fit.  We are dipping the apothecary lid.

2.  Put the item you will be dipping in the plastic container.  Fill with water to cover the lid.  Use a marker to draw a line on the bottle at the top of the water line.  This will show you how much etchall you will need.

3.  Dump out the water and fill the bottle to the marker line.  Place the glass lid in the liquid and set the timer for 15 minutes.  15 minutes is the standard amount of time you will use when etching with etchall(R).

4.  When the time is up; remove the lid from the etchall liquid.  Rinse & dry thoroughly.  

5.  Pour the etchall(R) liquid back into it's original container.  It will be good to go for another project!  I used the dip 'n etch to etch the heart shaped bottle using the same instructions.

6.  Now it is time for the Etchall(R) Creme.  If this is the first time you have used an etchall(r) stencil, I recommend watching an instruction video with Barbee which you will find here:  http://etchall.com/getting-started/

7.  Follow the instructions given and apply the stencil to the jar.  Use the Pick Tool to remove the pieces of the stencil that will make the design on the glass.  Make sure to leave the stencil in the places that give definition to the design.

8.  Follow the instructions given to apply the stencil to the front of the jar.  After picking out the pieces that you won't need; use the Squeegee to remove any air bubbles and to seal all of the edges.  Further prepare by applying tape around the stencil so that the etchall creme won't slide down the sides of the jar.  

9.  Apply a thick layer of etchall creme to the top of the stencil and lightly spread to cover the stencil.  Set the timer for 15 minutes.

10.  The magic!  When the time is up, use the Squeegee to remove as much as you can of the creme and return it to the original container.  As with the liquid, the creme will turn brown over time and multiple uses; but it will still etch!  Once the creme is put back in the container; rinse the jar under warm water, removing the tape and the stencil.  Once it is clean; give it a good dry and see how pretty the design looks!


11.  Once the lid is dry; paint it with the sponge using a pouncing motion.  Apply another coat as needed.  Allow to dry thoroughly before inserting into the top of the jar.


12.  Embellish!  Tie the ribbon around the neck of the jar.  Finish by adhering a pretty flower to the ribbon.  Trim a V in the ends of the ribbon.


I hope you got some inspiration here today.  

Make sure to take time to enjoy the small blessings along the way and,

Live Life with a Flourish!

Marilyn


I receive complementary product in
exchange for my creativity on this blog.


Monday, December 28, 2015

Dress up a Vintage Pyrex Dish with etchall creme!


Have you ever tried etching?  It can look a little intimidating if you haven't.  I use a product called etchall and it is fun and easy to use. The main ingredient is a glass project to finish and I enjoy searching for vintage pieces to etch.

Before you start; I highly recommend watching the video provided by Barbee at http://etchall.com/


Do you like to give food dishes to people and not have to worry about getting the dish back?  I love going to second hand stores.  Sometimes you will get lucky and find a "vintage" dish.  I almost always find something special.  I can then personalize the dish in some way and give it away with a gift of food in it.  Bottles, beverage containers and drinking glasses can be great finds too.

Here is a picture of the dish that I found.  Do you remember the Pyrex with the snowflake design? The color is popular again too!

The pictures to follow are to show how I etched the lid of the dish.

You will need:

Casserole dish with glass lid
etchallR etching creme
etchmaskR stencil combo pack
Tool:  etchall squeegee

painter's tape
Cricut or other cutting machine
cartridge or die for letters
scissors


*Note:  Figure out the size and shape you will need before you cut out the etchmask and transfer paper.
I used 1" letters and cut out each word separately on my Cricut machine.


1.  Apply the stencil paper to the etchmask only using the amount you will need for your project.  Cut out the word "GOOD".  Trim with scissors and apply to the glass lid.  Repeat; cutting out the word "EATS".  Apply to the glass lid as shown.  Use the squeegee tool to get out all of the air bubbles.

2.  Apply painters' tape around the stencil.  This is to prevent any of the etching creme to get on the glass.
3. Apply the etching creme and use the squeegee tool to spread it out over the stencil.  Be generous; but don't get any of the creme on the glass outside the tape.
4.  Set the timer for 15 minutes.  Remove the creme when the time is up and put it back into the jar. The etching creme is good to use over and over.  Take the glass to the sink and rinse with water; then remove all of the stencil and tape and wash & dry the dish thoroughly.

For the sake of the photograph below; I filled the dish with celery and carrots.  While these are good for you; I am thinking more about filling it with something a little more fattening before I give it as a gift.

I hope you got some inspiration to start etching!  I will be looking for new projects and sharing my new ideas on this blog.

I hope you are enjoying this holiday season.  The new year will be arriving in a couple of days!

Make sure to take time to enjoy the small blessings along the way and;

Live Life with a Flourish!

Marilyn


I have rec'd moderate compensation 
for this blog post.  :-)