Showing posts with label #etchall. Show all posts

Monday, May 22, 2017

Upcycled Home Decor with etchall(R)


We all love a good thrift store find, right?  I recently went in search of some items that I could put together for a fun home dec project.  I love the look of shabby chic and that allows me a lot of wiggle room when working with second hand items just waiting to get an update.  Read on to see what I found and how I made the etched mirror in the photo shown below.
You will need:  

etchall(R):  etching creme, etchmask(tm) Stencil ComboPak, Squeegee, Detail Pick Tool
wooden charger plate
8" round mirror
beige cording trim
chalk texture paint
paintbrushes
tacky glue
glue gun
die cut machine
water bucket
paper plates
paper towels

Instructions:

1.  Paint the plate.  Set aside to dry.

2.  Follow the manufacturer's instructions and use die-cut machine to cut out chosen pattern.  Make sure to test on regular paper to get the proper fit before cutting from the etchmask(R).
3.  Clean the mirror and allow to dry thoroughly.  Remove the release paper from the etchmask and apply to the mirror.  Use the squeegee to remove air bubbles and get a firm adhesion to the mirror.
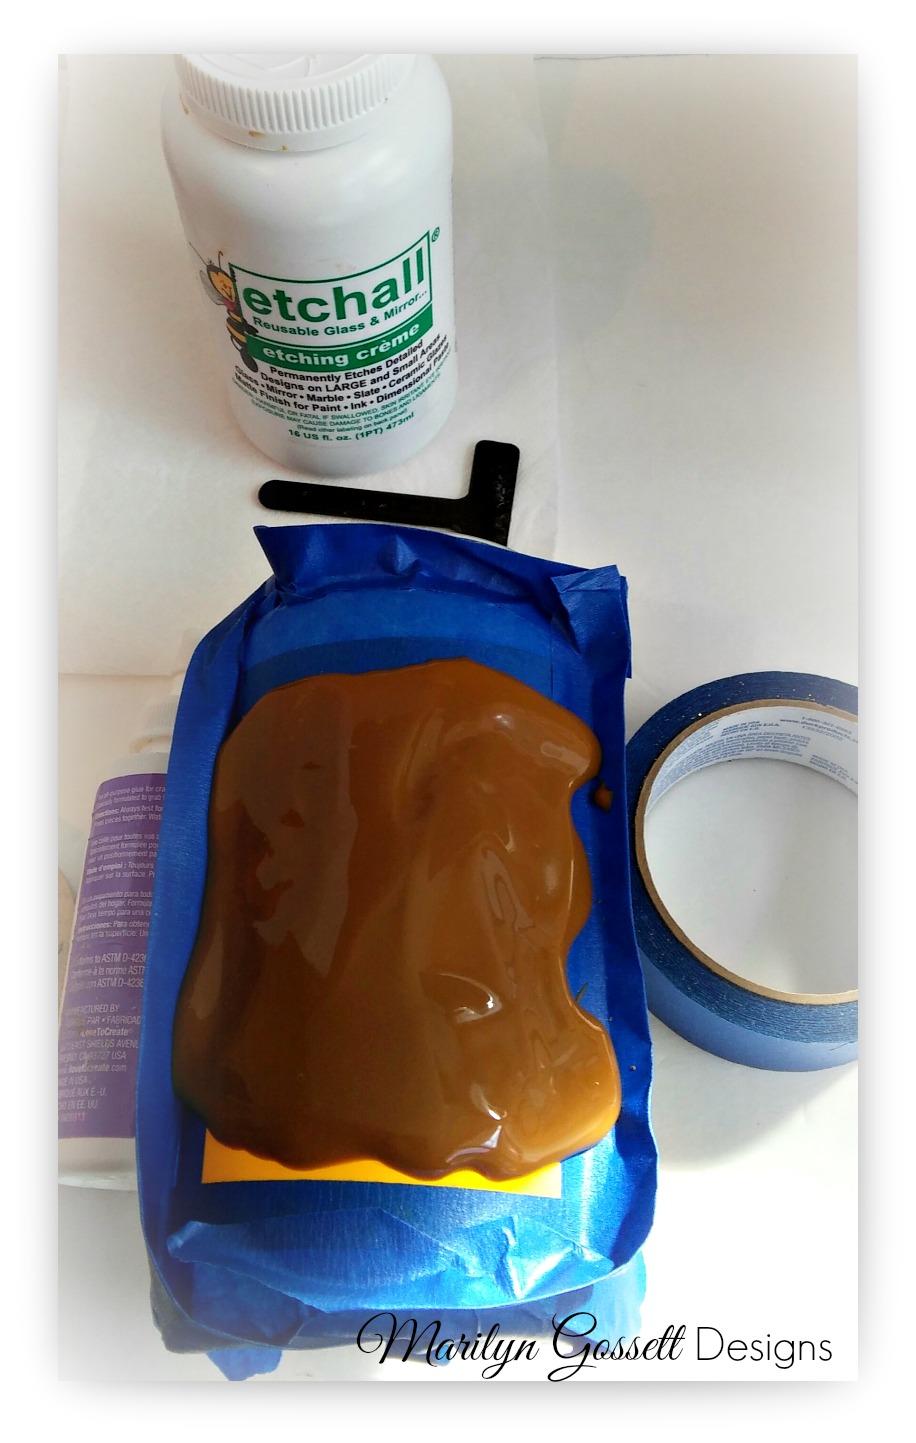
4.  Pour the etchall(R) creme onto the mirror.  The etchall creme shown in my photo has been used a few       times.  The creme will turn a dark brown color over time; but this does not affect the product's               effectiveness.  Make sure to put the creme back in the bottle after this use for another one later!  No     waste allowed!


5.  Spread the etchall creme over the surface of the mirror.  Set the timer for 15 minutes and let it "cook".  
6.  When the time is up; remove the etchall creme and put it back in the jar.  Rinse the mirror under running water, removing the etchmask(R).  The pattern will be revealed and the mirror is ready for the next step.
7.  Apply tacky glue to the indented area of the platter.  Center the mirror and press into the glue.  Press the cording into the glue and wrap around the mirror, covering the remaining space in the indented space.         Refer to photograph to finish.

8.  Spiral some cording into a 1-1/2" circle, adhering to a piece of cardstock.  Cut out; center and adhere to the bottom of the mirror.


I hope you got some inspiration here today. 

 Make sure to take the time to enjoy the small blessings along the way and,

Life Life with a Flourish!

Marilyn


I receive complimentary product in exchange
for my creativity on this blog.


Monday, March 13, 2017

Celebrate Spring with Etchall(R)!


Etchall(R); a little paint and some embellishments will take an inexpensive glass container to new heights!  I will show you how I transformed an apothecary jar and a glass bottle into gifts I would give or keep as home decor.


Materials:


Etchall(R):  etching creme; dip 'n etch liquid; "Love you a Latte" stencil; Detail Pick Tool;  Squeegee
Glass:  apothecary jar; heart shaped bottle with cork lid

Paint:  Multi-surface acrylic - Teal

Sponge
Ribbon
bunch of silk flowers
mulberry or paper flowers
scissors
painters tape or masking tape
plastic container for dipping

Adhesives

Instructions:

** Before you start:  You will be re-using the etchall(R) creme and liquid.  Do not throw it away!  It is good for many uses even if it starts turning brown as it has in the photos shown here.  I will use it for as long as it keeps etching.

1.  Dipping in etchall:  Cut the top off of a disposable plastic container.  The smaller size; the better.  It has to be large enough for the piece to fit.  We are dipping the apothecary lid.

2.  Put the item you will be dipping in the plastic container.  Fill with water to cover the lid.  Use a marker to draw a line on the bottle at the top of the water line.  This will show you how much etchall you will need.

3.  Dump out the water and fill the bottle to the marker line.  Place the glass lid in the liquid and set the timer for 15 minutes.  15 minutes is the standard amount of time you will use when etching with etchall(R).

4.  When the time is up; remove the lid from the etchall liquid.  Rinse & dry thoroughly.  

5.  Pour the etchall(R) liquid back into it's original container.  It will be good to go for another project!  I used the dip 'n etch to etch the heart shaped bottle using the same instructions.

6.  Now it is time for the Etchall(R) Creme.  If this is the first time you have used an etchall(r) stencil, I recommend watching an instruction video with Barbee which you will find here:  http://etchall.com/getting-started/

7.  Follow the instructions given and apply the stencil to the jar.  Use the Pick Tool to remove the pieces of the stencil that will make the design on the glass.  Make sure to leave the stencil in the places that give definition to the design.

8.  Follow the instructions given to apply the stencil to the front of the jar.  After picking out the pieces that you won't need; use the Squeegee to remove any air bubbles and to seal all of the edges.  Further prepare by applying tape around the stencil so that the etchall creme won't slide down the sides of the jar.  

9.  Apply a thick layer of etchall creme to the top of the stencil and lightly spread to cover the stencil.  Set the timer for 15 minutes.

10.  The magic!  When the time is up, use the Squeegee to remove as much as you can of the creme and return it to the original container.  As with the liquid, the creme will turn brown over time and multiple uses; but it will still etch!  Once the creme is put back in the container; rinse the jar under warm water, removing the tape and the stencil.  Once it is clean; give it a good dry and see how pretty the design looks!


11.  Once the lid is dry; paint it with the sponge using a pouncing motion.  Apply another coat as needed.  Allow to dry thoroughly before inserting into the top of the jar.


12.  Embellish!  Tie the ribbon around the neck of the jar.  Finish by adhering a pretty flower to the ribbon.  Trim a V in the ends of the ribbon.


I hope you got some inspiration here today.  

Make sure to take time to enjoy the small blessings along the way and,

Live Life with a Flourish!

Marilyn


I receive complementary product in
exchange for my creativity on this blog.


Friday, May 27, 2016

Etch a DIY gift of coffee from a recycled jar!


Recycle a jar and lid to create this special etched jar for the coffee lover!  I think it is perfect for a friend or as a daily reminder for yourself!  It was a quick and easy project with the help of etchall pre-made stencils!


You can find the vinyl stencils here:  http://etchall.com/store/products/category/stencils/


You will need:

etchall tools:  Detail Pick Tool  http://etchall.com/store/products/etchall-detail-pick-tool/  
                     Squeegee  http://etchall.com/store/products/etchall-squeegee/
etchall vinyl stencil:  "You are Brew-tiful"

recycled jar with lid
painters tape
ribbon:  black and white grosgrain with chevron design (1-1/2")
tacky glue
glue gun  *optional
clothespins:  spring action
scissors

Instructions:

Remove the release paper to expose the sticky side of the vinyl stencil.  Adhere to the jar; smoothing out all of the air bubbles.  Use the etchall pick to remove all of the letters as that is where you will be putting the etching creme.  This is a good time to watch Barbee's video if you have never etched or used etchall's stencils to etch.  Here is the video:  http://etchall.com/getting-started/

Apply the painter's tape around the stencil and make a lip so the creme won't go past the stencil onto the glass.  Use a couple of heavier objects to hold your jar in place by setting them on either side of the jar as shown.  Follow the manufacturer's instructions and apply the etching creme.  I use the squeegee and a craft stick for this step.  Notice that luscious chocolaty look of the etching creme?  It starts out a light color and over time will turn dark.  This doesn't affect the etching power of the product; so use it over and over.  Return the creme to the container using the squeegee after the 15 minute waiting period is up.

Remove the tape and stencil, then wash and dry your jar.  See the etch?  Isn't that cool?? 

Cut 3 pieces of the ribbon slightly longer than the edges of the jar lid.  Match the pattern with the middle piece of ribbon on the top.  Apply tacky glue to the top of the lid and adhere the ribbons as shown.


Trim the excess ribbon off around the edges of the jar lid.  Use your finger to gently apply a little tacky glue around the raw edges of the ribbon to keep it from fraying.


Measure around the circumference of the jar lid.  cut a piece of the ribbon the same length.  Fold the ribbon in two, wrong sides facing and adhere the sides together.

 I used tacky glue for this step so needed to clip the sides together until the glue dried.  You can use a glue gun if you want the process to go faster.


Once the glue is dry; adhere the folded ribbon around the edges of the jar lid with the fold facing up.  Tuck in any frayed edges of the ribbons on the top of the lid.  You can further embellish the jar by tying a tag around the neck of the jar, etc.

Fill the jar with coffee beans, Keurig cups or your choice of coffee.  Maybe your friend is a tea drinker!

I hope you got a little inspiration here today to make life better for someone; maybe for yourself!
I would love for you to leave me a comment or question.  I enjoy getting feedback!

Take time to enjoy the small blessings along the way, and,

Live Life with a Flourish!

Marilyn


*Designer tip:  If the etch doesn't show up as much as you would like; use a permanent white inkpad and tissue to deepen the etched design.  


I have rec'd a small stipend
for showcasing etchall products
in this design.


Monday, May 2, 2016

Light up someone's Mother's Day!


Do you need an idea to light up someone's life for Mother's Day this month?  
My little lamp is made from a ball jar and very cool lamp shade from etchallR.  Follow along and I will tell you what you need to create your own cool lamp!


You will need:
etchallR:  dip 'n etch
quart jar
wooden candle cup or spool
chalk paints
trims:  ribbon with beads and sequins; sheer polyester flowers by the roll
flowers:  I made my own from cardstock but you can use any kind
pearlstring
glue gun
tacky glue
paintbrush
painter's tape
recycled plastic container for etching
marbles or something heavy to weight the jar


Directions:

  1.   Follow Manufacturer's directions to etch your jar.  There is a great tutorial on the site that will give you many tips.  Here is the link:  http://etchall.com/getting-started/  Also, check out Barbee's Tips and Tricks if you haven't etched before. The etching will allow the jar to have "tooth" that will hold the paint.  This is useful anytime you are painting on a glass surface.  "etch" it first! Don't throw away the etchall!  Pour it back in the container for another use.  (Color doesn't matter!)
  2. Completely wash and dry the jar after etching.  Apply the painter's tape; measuring even spaces between the tape.  Paint your first color.  Allow to dry thoroughly.  This should take a couple of hours.  Remove the tape and take along the sides of your first color.  Paint your second color of stripes.  Allow to dry thoroughly.  
  3. Paint the lid of the jar and the wooden piece you have chosen to activate the light switch on the shade.  I used a candle cup; but a wooden spool the right size will also work nicely.
  4. Decorate and embellish your shade.  I used the shade pattern given in the kit and cut out a shade from paper.  I decorated the paper lampshade and placed it over the acrylic lampshade.  I used tacky glue for the trims and the glue gun to apply the embellishments to the jar.  The pearls were cut from pearlstring and adhered to the middle of each flower.  I cut a few flowers from the sheer trim on a roll and glued them amongst the paper flowers.  Cut some green leaves from cardstock and glue them among the flowers.
  5. Adhere the candle cup to the center of the lid.  Place the shade on top.  The lights will be activated whenever you want them to be!
If you are wondering where you can find the bead trim on the ribbon; usually you will find this at your local fabric store in the trim section.  It is sold by the yard.  Some stores will have it pre-packaged though it is not as easy to find as it used to be.

Designer tip:  You now have a lamp base that is a whole empty jar!  Why not hide your stash, chocolates or an extra little something in the jar?  I am sure you will figure something out!

I hope you got some inspiration here today.  I am attaching another photo of another lamp I made, but with a patriotic theme.  I love these shades and want to try them on everything!  Summer is coming and these lamps are PERFECT for outside celebrations.

Here is the link if you would like instructions to this lamp!  http://marilyngossettdesigns.blogspot.com/2016/04/patriotic-lamp-with-etchall-dip-n-etch.html

Take time to enjoy the small blessings along the way and
Live Life with a Flourish!

Marilyn


*Ps.  I love hearing from you.  Please leave your comments or questions!


I receive free product in return for 
sharing my creativity on this blog.