Saturday, January 28, 2017

Personalize an erase message board with your colored art!


Do you own an art coloring book?  Most adults that I know own at least one and enjoy bringing the art to living color as a way to beat stress and enjoy some solitude.  Deflecto Crafts have a frame that is perfect for showcasing your favorite artwork.  By adding some black cardstock paper you can make it into a wet erase board to make lists and leave messages.  There are many options to apply to the basic concept that I show here to make it your own!


Supplies:

Deflecto art display frame 6" x 12"; wet erase marker
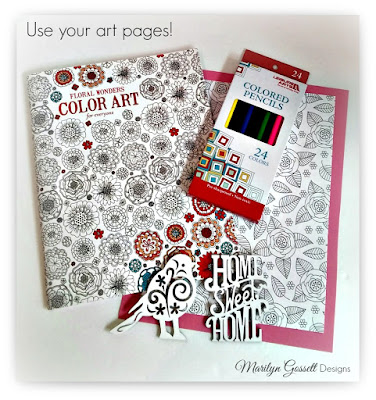
12" x 12" cardstock:  dark pink, handwriting on white, black
Floral Color Art coloring book
colored pencils
laser cut wood shapes:  bird, Home Sweet Home
paper trimmer
adhesives


Instructions:

Remove the frame from the wrapper and make sure that the opening is on the top side of the frame.  Cut the pink cardstock to fit the frame.  

Cut the printed cardstock slightly larger than the colored art print.  Layer and adhere papers.  Cut a 5-1/2" x 8-1/2" rectangle of black cardstock.  Adhere to the center of the art print.  Insert into the frame.

Adhere the wood cut-outs to the frame.

Mount the frame using the hook and loop tape that is enclosed in the packaging.


I hope you got some inspiration from the blog today.  I had a difficult time picking an art page because there are so many beautiful designs!  There are a plethora of wood shapes and paper patterns to choose from.  You can make it totally your own!

Make sure to take time to enjoy the small blessings along the way and
Live Life with a Flourish!

Marilyn


I am provided free product in exchange
for showcasing my creativity on this blog.


Monday, January 2, 2017

Deflecto storage for the New Year!


 Burlap and cording trim are timeless.  They both come in a variety of patterns and colors.  Deflecto storage is wonderful for all sorts of things in the office and at home.  I am giving my vanity an update and chose several deflecto products that I love for this project!  Shown below are 2 of the storage cubes that I have stacked and attached together with the metal connector that comes with each cube.  The cubes can be arranged as side by side or stacking.  I am using the deflecto X-Divider Cube to hold cosmetic brushes and the like.  Pencils, anything that lies flat can go in these compartments.


The Interlocking Storage Organizer comes with two lids or six lids that come apart or stack.  I have taken these apart and I am using them as containers for cotton balls, cotton swabs and wedge sponges.  


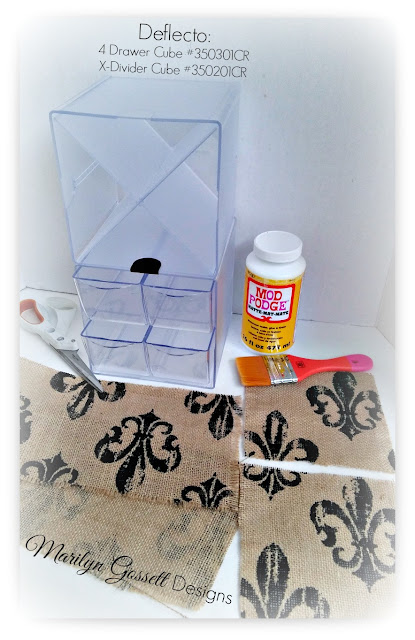
Pictured below are the components for the storage compartment that I created.  Read on, to the next set of photos and I will show you how to cut the burlap.

You will need:

deflecto:  4-Drawer Cube #350301CR; X-Divider Cube #350201; interlocking storage organizer with 6 lids #20101CR
Joy embroidered letters:  1-1/2" Monogram black  (I used my initials)  http://joysa.com/
cording trim:  beige in 1/8" and 1/4"  (several yards of each)  http://www.decorativetrimmings.com/
Mod Podge:  matte with brush  https://www.plaidonline.com/default.aspx
burlap with fleur de lis pattern
scissors
adhesives:  glue gun; tacky glue


Instructions:

1.  Measure for the width and length that you want to cut your fabric.  The cubes are 6" x 6".  I measured and cut a 6" x 30" piece for the sides and the top.  The back pieces were measured and cut in 6" squares with the patterns matching up before adhering to the storage containers.

2.  Find a string in the burlap and pull it the length of the piece you will be cutting.  Pull the string all the way out without breaking it.  If the string breaks, cut up to the place the string broke off and continue pulling the same string.  This will give you the guide you need to cut the burlap straight and not get fraying.
3.  Below is a photo of the burlap being cut along the guide line.  This is a sure-fire way to cut your burlap and be happy with the results!  Designer tip:  If you are cutting individual pieces for a placemat or the like; pull and remove the strings around each side to create a fringe.


4.  I applied Matte Mod Podge to the surface of the storage bins and to the wrong side of the burlap.  Make sure to cover your surface with wax paper or freezer paper before moving on with this step.  Adhere the burlap to the top and sides of the containers.  Then; finish by adhering the squares to the back.  I left the bottom without fabric.

5.  Use a glue gun (or whatever works best for you), to adhere the cording trim to the edges of the container as shown.  

6.  Cording Medallions:  Create the cording medallions by pinching one end of the cording together and gluing to a scrap of burlap.  Continue by creating a spiral; gluing as you go; until you have the size that you desire.  Cut the medallion out; concealing the burlap edges.  Repeat for each medallion.  Adhere to the storage container as shown.

7.  For the storage containers:  Separate into 3 containers with lids.  Follow the instructions for the cording medallions and create a medallion for the inside of the top lid of each container.  Adhere the monogram letters to the medallion inside each lid. Adhere cording around the outside edges; top and bottom of one container. Make sure not to interfere with the interlocking portion of the container.  Repeat for the others.  Finish:  Apply medallion to the front of the cube storage and adhere a monogram letter.  Enjoy!

Deflecto has your New Year's Resolutions covered!  We all aspire to clean up our clutter and make the new year bright, right??  Deflecto can be found in various craft stores and on Amazon.  Check out the link given to peruse the products that are offered.

Thank you for checking out my blog today.  I hope you have a wonderful year ahead....take time to enjoy the small blessings along the way; and...

Live Life with a Flourish!

Marilyn


I have rec'd free product from the companies mentioned in this blog
for sharing my creativity.  <3


Friday, December 9, 2016

Holiday Foodie Friends


Jazz up your holiday parties and dinners with some of these place and food markers.

Deflecto has the supplies you need to create these little character nameplates and food markers.  Here is some inspiration to sweeten up your holiday entertaining!


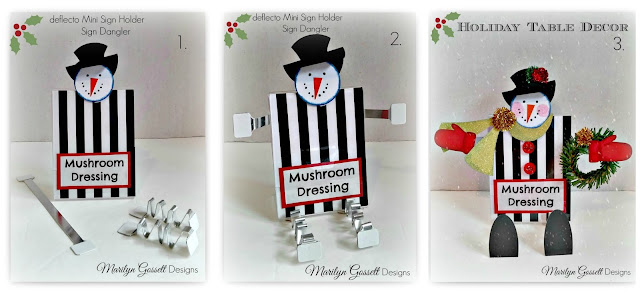
Refer to the photo given below.  The sign danglers are used for the arms and the legs.  Punch out ovals as shown below and layer.  The head is a small candle light but can be replaced with a paper face.
I cut the pieces of magnetic craft sheet to fit on the flat part of the angled sign holder.  After adhering the white side to the sign holder; the magnet grip was used to seat the versagrip magnetic base.  A cookie created from die cuts was placed in the angled sign holder.  The clip will be used to insert a paper sign identifying the food that is being served at the buffet. 
Pictured below are the snowman and gingerbread nameplate holders.  I printed out a name and cut it to fit as shown.  


I hope you got some inspiration here today and enjoy a blessed Christmas and New Year!

Take time to enjoy the small blessings along the way and;

Live Life with a Flourish!

Marilyn


Monday, December 5, 2016

etchall'd Mirror Wall Hanging for Christmas

Years ago I discovered a wonderful etching product called 
etchall (R).  I had a space I needed to fill with a Christmas
decoration and decided to create my own. 
I gathered some materials and went to work!

To complete this project you will need:

etchall (R) products:  etching creme, squeegee, detail pick, etchmask    Link:  http://etchall.com/
craft mirrors:  three 6" high oval
wide burlap ribbon:  one yard, 3-1/2" wide
red burlap
fusible web
pencil
sheer ribbon:  one yard, 1-1/4" wide
1/8" red ribbon
jingle bells:  one 1-1/2", six 3/4"
Christmas spray pik
electronic die cutting machine:  Cut out 3" high letters spelling JOY
scissors
glue gun and glue sticks
tacky glue
paper towels

Instructions:

1.  If you have never used etchall (R)  products; then begin by watching this video.  Barbee will describe how to get started in her video.  http://etchall.com/getting-started/

2.  Cut out your letters from the etchall (R) etchmask.  Set aside.

3.  Clean the mirrors and dry thoroughly.  Remove the release paper from one letter. The letters I cut out had small circles cut within each letter.  I used the etchall pick tool to remove the tiny circles.  Remove the release paper from one letter.  Center the letter on a mirror and adhere.  Use the squeegee tool to remove any air bubbles.  Repeat for each letter.


4.  Follow the instructions given on the etchall(R) creme bottle and thoroughly cover the surface of each mirror with the creme.  Apply a thick layer; gently smoothing over the top with the squeegee tool.  *Note:  The creme has turned a dark shade of brown because it has been re-used several times.  This color does not change the effectiveness of the creme.  You will return the creme to the jar when you are done for another use!


5.  Let the etchall creme do it's thing.  It will take about 15 minutes.  When the time is up' scrape the creme back into the bottle for a later use, then rinse the mirrors, removing any residue.  Remove the etchmask and rinse again.  Dry thoroughly using a soft cloth.

6.  Burlap borders:  Apply fusible web to the back of a 14" square of red burlap; following the manufacturers directions.  Turn the burlap so the release paper is facing up and trace around each mirror leaving about a 1//2" space between each tracing.  Cut out around one oval leaving a 1/4" border.  Repeat for each burlap oval.

6.  Cut the piece of burlap ribbon.  Cut a V in the bottom end.  Fold under the top edge  and glue; making a 1" casing for the ribbon hanger.  Thread ribbon through the casing and tie the ends together making a hanger.

7. Glue the bells and Christmas picks to the top of the ribbon. Center and adhere the mirrors to the ribbon as shown. Thread the 1/8" ribbon tails through each bell, tying a knot after it to secure.  The picture below shows the wall hanging before the Christmas sprays were glued to the top.


8.  The photo below is about how your wall hanging should look when it is finished.  Personalize the wall hanging to match your own decor.  It is hanging in my "country room" with lots of traditional Christmas colors.  I have two more rooms I decorate with romantic country and elegance.  I would use different colors for those rooms.

I hope you have gotten some inspiration here today.  Be sure to visit the etchall (R) website to check out a plethora of awesome products.   I have only shown a few here today.

Make sure to enjoy the small blessings along the way and
Live Life with a Flourish!

Cheers!

Marilyn


Bring Joy with this decorated stacking storage container!

JOY TO THE WORLD!  Christmas is just around the corner and it is time to start thinking about the gifts we want to give and how we want to decorate.  I think everyone loves snowmen and Joy letters make gift giving fast and easy!  Everyone loves a message of JOY and you can bring others joy with the quick and easy design I am showing here today.


Materials:

defecto:  Interlocking storage organizer  #20101CR; sign danglers #20014CR
1-1/2" embroidered letters:  J O Y      Link:  http://joysa.com/
defecto:  Interlocking storage organizer; sign dangler
rick rack:  1/2" red
ribbon:  5/8" black & silver; 12"
candle light:  Snowman
adhesives
scissors
candy or gift to place in the container


Instructions:

1.  Remove release paper from the back of each letter and adhere to the canister as shown; one letter to each compartment.

2. Adhere a piece of ric-rac to the top of each compartment; not interfering with the lock.  Line up the seams in the back.

3.  Bend the sign dangler accordion fashion or as you would a fan.  Remove the release paper from each end.  Adhere one end to the top of the lid.  Adhere the candle light snowman to the opposite end.  This may take some extra adhesive to hold the light in place.

4.  Fill the canister with candies or other surprises for the recipient.  Finish with a bow under the chin!


EnJOY the coming holidays!  A gift from the heart is always a pleasure for the giver and the receiver.

Merry Christmas and may you have a very happy New Year!


Wednesday, November 16, 2016

Rinea Paper Foil for Christmas Crafting!


Here we come a-caroling!  We are halfway through November and onto December!  You need some quick and easy gifts and cards, right?  You have come to the right blog hop!  Our designers have lots of great ideas for you!
For the cards:
Rinea double-sided paper foil in gold and glue
Cricut Cuttlebug or other manual die machine
Embossing folders:  Christmas tree; Snowmen with snowflakes
Punches:  Corner trimmers, Corner shapes
Ribbon:  1-1/4" sheer off-white
Plain greeting cards:  5 x 7"
Envelopes
Adhesives
Scissors

For the ornament boxes:
Paper trimmer
Cardstock
Box pre-made or box pattern
Ribbon
Adhesives
Scissors


The Rinea paper foil comes in many interesting color combinations including bold, pastel, and metallic colors with glossy and embossed finishes giving you lots of options to play with and combine. Please go to our product store to see the different sizes and color combinations available.  http://www.globalcrafting.com/

Below is a visual tutorial of how to make some cute gift box ornaments.  Add a hanger and put them on the tree or give them as a gift.  The recipient can reuse the box as an ornament or re-gift it.  The roses are a circle cut in a spiral and then rolled into a flower.  The foil is double sided so it makes beautiful flowers.


I hope you have enjoyed the blog post and got some inspiration here today.  

Make sure to enjoy the small blessings along the way and,

Live Life with a Flourish!

Marilyn


Visit the store at:
http://www.globalcrafting.com/


Tuesday, October 25, 2016

Fall & Halloween Treats!


T'was the night before Halloween.....and all through the house...there was a whole lot of stirring....but not by a mouse!

We like to "Boo" our friends and neighbors anonymously with treats every year.  Here is an inexpensive treat bottle that can be decorated and filled with candies for that special friend to enjoy and display.


You will need:

Joy Embroidered Letters:  1" orange letters spelling BOO      Find online here:  http://joysa.com/
etchall(R):  dip'n etch etching liquid
Smoothfoam:  1-1/4" ball
plastic liter bottle:  Cut off the top
acrylic paints:  DecoArt Americana in Persimmon, Flesh Tone, Milk Chocolate, Lamp Black, White
paintbrush:  3/4" flat, #3 round
cardstock:  scrap of green
jute string
adhesives
green embroidery floss

Tools:

scissors
paper punches: 1-3/4" circle; 1/2" circle
hot wire foam cutter or knife
permanent marker:  black ultra fine point
Water bucket and paper towels


Instructions:

1.  Head:  The smooth side will be the face.  With that in mind; cut a small rounded portion from the bottom of the Smoothfoam ball.  Adhere the flat side to the top of the bottle cork.  Set aside.

2.  Fill the bottle with something to weight it.  I used smooth decorative round stones.  Set the bottle in the open part of the 2 liter bottle.  Fill up to the bottle neck with water.  Remove the bottle. Using a black marker; mark the water line on the outside of the bottle. Pour out the water. You will fill up to this line with dip 'n etch liquid.

3.  Insert the clean bottle into the dip 'n etch.  Set the timer for 15 minutes.  When time is up; remove the bottle from the plastic liter bottle and rinse.  Pour the etching liquid back into the original bottle.  It will be good for many uses.  If it turns a dark color, that is OK.  It is still good for another use.


4.  Paint:   Paint the head and cork Fleshtone.  Allow to dry.  Refer to the photo given and paint 2 small White circles for the eyes.  Let dry.  Apply a tiny Black dip dot to the center of each eye.  Use the black pen to outline the whites of the eyes, draw the nose and the mouth.  Draw the teeth; then paint White.  Paint the bottle Persimmon.  Allow to dry and then shade using the Milk Chocolate.

5.  Hair:  Wrap jute twine around one hand about ten times.  Slide off of hand and cut the loop at each end.  Tie an extra piece of twine around the middle and knot to secure.  Glue to the top of the head.

5.  Hat:  Punch a 1-3/4" circle and a 1/2" circle from the green cardstock.  Cut a 1-1/2" x 3" rectangle of the same cardstock.  Roll it into a 1/2" x 3" cylinder.  Adhere the small round punch to the top of the cylinder. Glue the opposite end to the top of the circle.  Glue the hat to the top of the hair.

6.  Finish:  Tie embroidery floss around  the top of the hat crown as shown.  Tie another piece around the bottle neck and finish with a shoestring bow.  Adhere the letters to the front of the bottle.  


7.  Have a spooky good Halloween!


Note:  I receive a small stipend  in return 
using my creativity to show embroidered
letters by Joysa.